
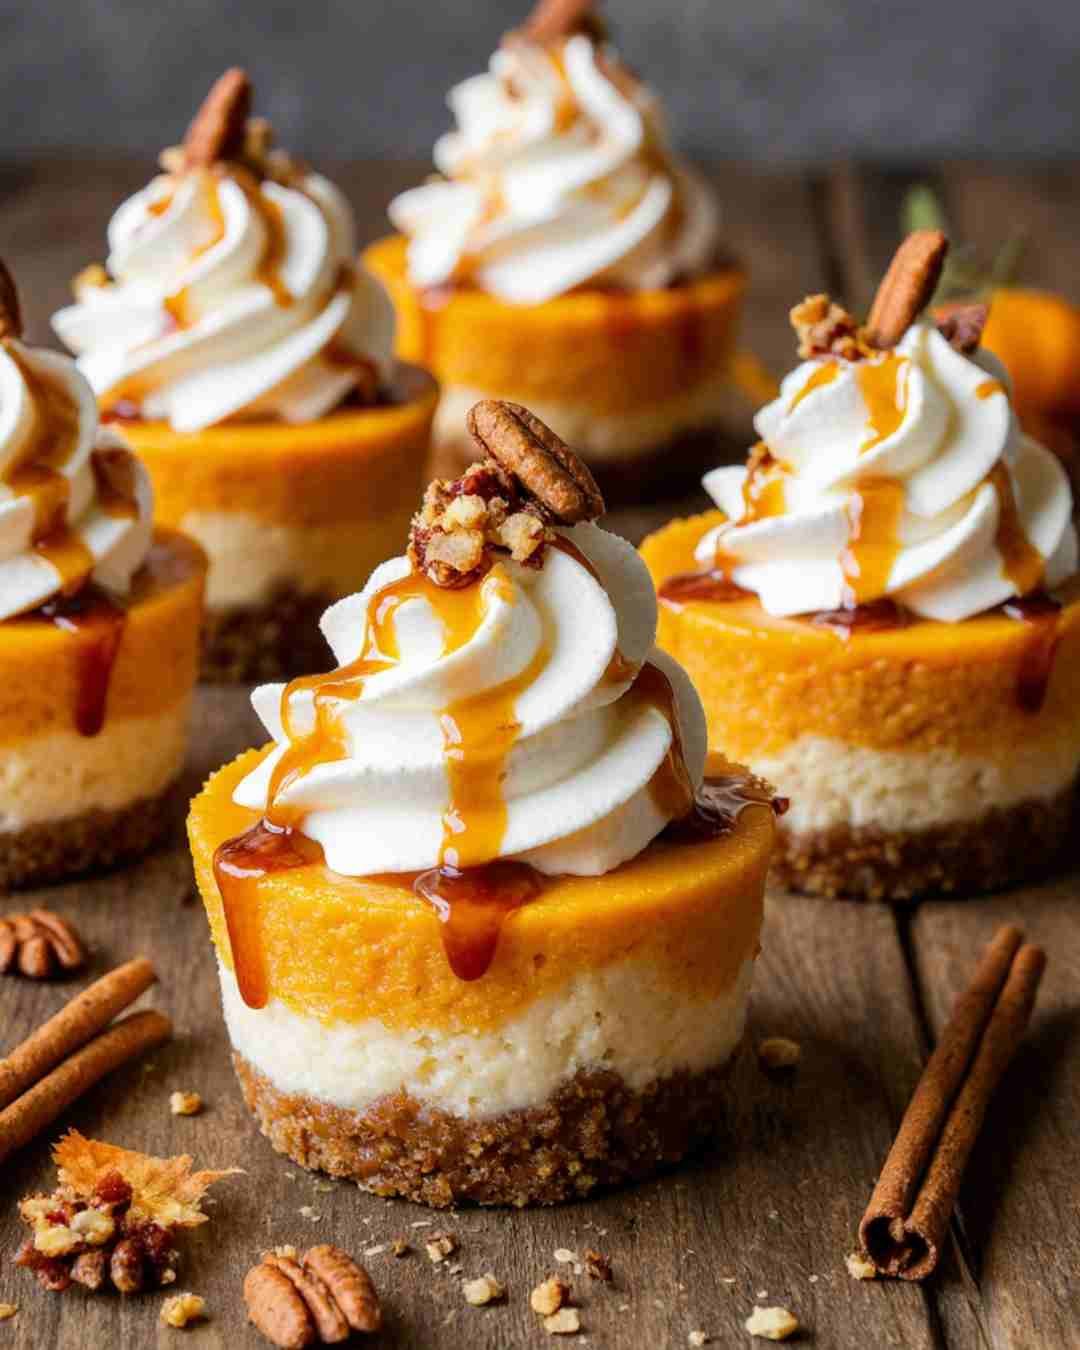
Mini Sweet Potato Cheesecake Cups Recipe – Silky, Spiced, and Irresistible!
If autumn could bake, it would come out of the oven as these Sweet Potato Cheesecake Cups—creamy, spiced, and cozy with every bite. Imagine buttery graham crusts topped with a silky sweet-potato cheesecake filling that’s just the right mix of sweet, tangy, and fall-spiced. They’re mini, mess-free, and dangerously easy to eat one after another.
Whether you’re prepping for Thanksgiving, Friendsgiving, or a random Tuesday that deserves dessert, these bite-size cheesecakes deliver all the warmth of sweet potato pie without the drama of slicing or cracking a big cheesecake.
Why You’ll Love These Sweet Potato Cheesecake Cups
Here’s why these little cheesecakes will totally steal the spotlight:
- They’re perfectly portioned for parties or make-ahead desserts.
- You can prep them in under 30 minutes.
- They taste like fall in a bite — smooth, spiced, and sweet.
- They’re a fun twist on traditional pie and pair beautifully with a cozy drink or a plate of Hot Chocolate Pancakes for brunch.
- They chill beautifully, so you can make them ahead of time for gatherings.
Sweet Potato Cheesecake Cups Ingredients
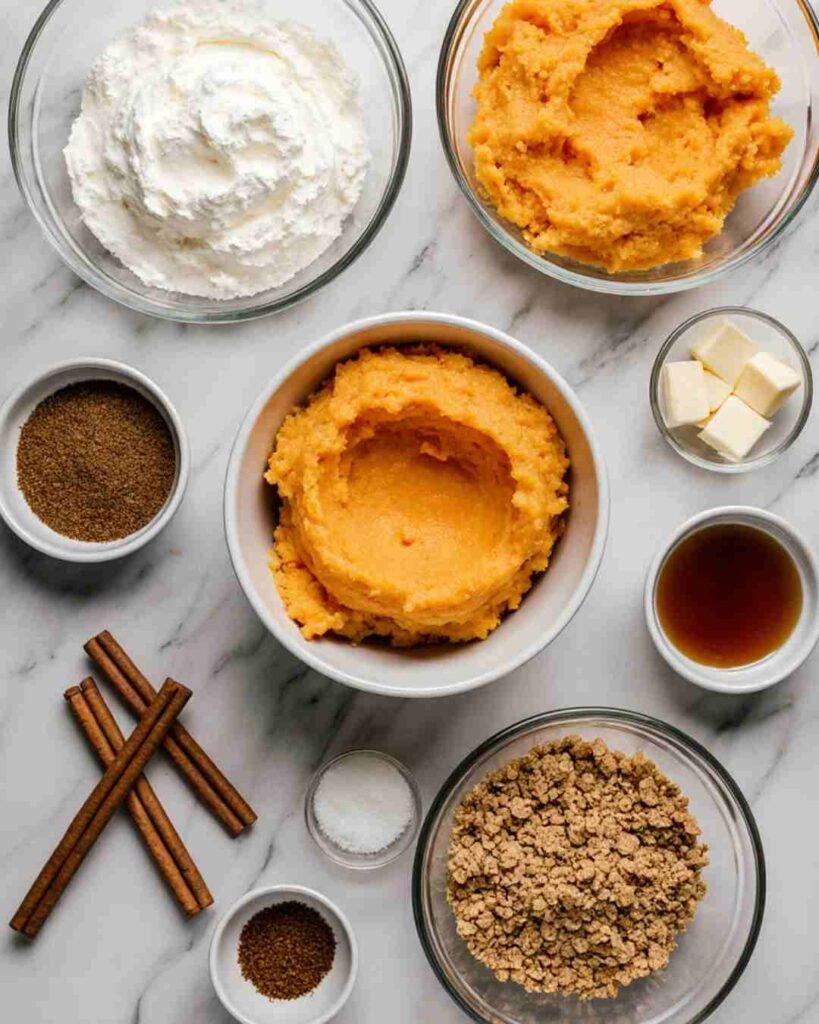
Crust
- 1 cup (100 g) graham cracker crumbs — or swap for gingersnaps for extra spice.
- 3 Tbsp melted butter — the glue that makes everything deliciously crumbly.
- 2 Tbsp brown sugar — for a subtle caramel undertone.
- Pinch of salt — to balance the sweetness and make flavors pop.
Cheesecake Filling
- 8 oz (226 g) cream cheese, softened — let it sit out so it blends smooth.
- 1 cup mashed sweet potato — roasted or boiled until soft, then mashed silky-smooth.
- ¼ cup granulated sugar
- ¼ cup brown sugar — the dream team of sweetness.
- 1 large egg, room temperature
- 1 tsp vanilla extract
- ½ tsp ground cinnamon
- ¼ tsp nutmeg (optional but cozy)
- 1 Tbsp sour cream or Greek yogurt — adds a lush, creamy tang.
- Pinch of salt
Toppings (optional but highly encouraged)
- Whipped cream
- Crushed pecans or walnuts
- Maple syrup drizzle
- Toasted mini marshmallows (for sweet-potato-pie nostalgia)
Instructions
1 Prep Your Pan and Oven
Preheat to 325°F (160°C). Line a 12-cup muffin tin with paper or silicone liners—the silicone ones pop out perfectly without tearing.
Give yourself space: you’ll be layering crust and filling, so have both bowls ready.
2 Make the Crust
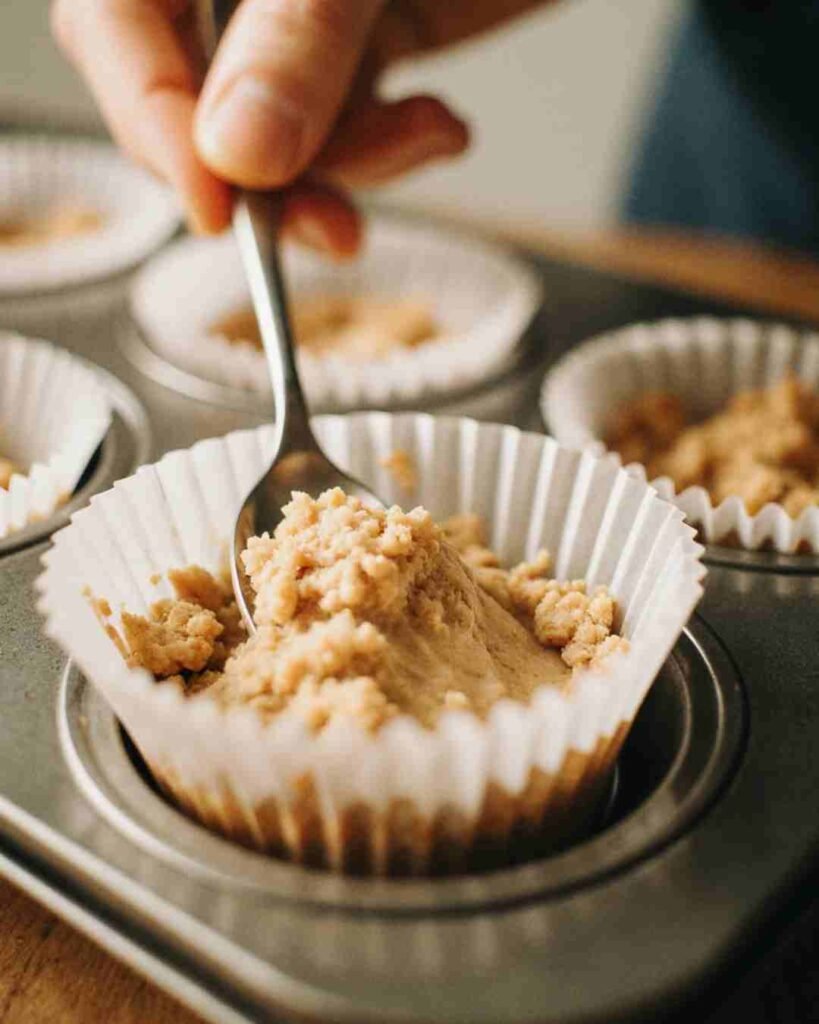
In a medium bowl, mix graham crumbs, melted butter, brown sugar, and salt. Stir until the mixture looks like damp sand and holds shape when pinched.
Spoon 1 heaping tablespoon into each liner, pressing it down firmly with the back of a spoon or a flat-bottom glass.
Bake for 5 minutes to set the crust. Let it cool while you make the filling.
Pro Tip: Pre-baking prevents soggy crusts — a must according to the Serious Eats guide to perfect cheesecakes.
3 Mash the Sweet Potato (if you haven’t already)
If you’re starting from fresh sweet potatoes, roast or boil them until soft. Peel and mash until creamy—no chunks allowed.
You can even toss them in a food processor for 30 seconds for that velvet-smooth finish. Texture matters here!
4 Mix the Cheesecake Filling
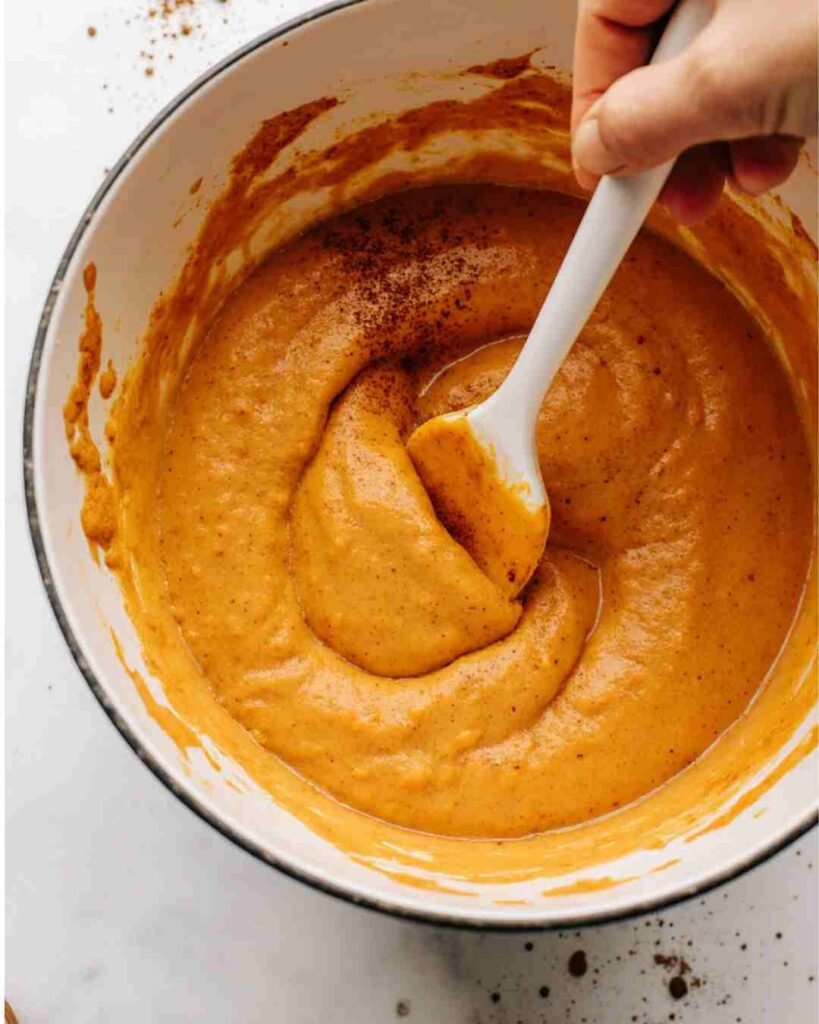
In a large bowl, beat the softened cream cheese until smooth and fluffy. Add the sweet potato puree, sugars, egg, vanilla, cinnamon, nutmeg, sour cream, and salt.
Mix on low-medium speed just until everything’s combined and silky. Overmixing adds air, which can cause cracks later.
Baker’s Wisdom: Cheesecake filling doesn’t like cardio. Keep mixing gentle.
Taste a spoonful (chef’s tax) — you’ll notice the perfect blend of creamy, earthy sweet potato and subtle spice.
5 Fill the Cups

Divide the filling evenly among your muffin cups, leaving about ⅛ inch from the top. Smooth the surfaces gently for even baking.
This is your canvas—smooth tops now mean perfect swirls of whipped cream later.
6 Bake to Perfection
Slide the tray into the oven and bake for 18–20 minutes, until the edges are set and centers have a gentle jiggle—think “wiggle, not wave.”
Avoid opening the oven door too early. Cheesecake is shy; sudden drafts make it sulk and crack.
Once baked, let them rest in the warm oven with the door cracked for 5 minutes before removing.
7 Cool and Chill
Let them cool in the pan for 15 minutes, then transfer to a wire rack. Once cool, refrigerate for at least 2 hours (overnight is best).
Quick-Chill Tip: In a hurry? Chill them in the freezer for 30 minutes — they’ll be ready to serve faster than our Thai Peanut Chicken Wraps disappear at lunch!
8 Cool Like a Pro
Cool the cups in the pan for about 15 minutes, then transfer to a wire rack to reach room temperature.
After that, refrigerate them for at least 2 hours (overnight if you can resist). The texture transforms from soft custard to creamy dream.
Quick-Chill Hack: In a hurry? Pop them into the freezer for 30 minutes before serving. Works like a charm.
8 Decorate & Serve

Right before serving, top with whipped cream, a drizzle of maple syrup, and a sprinkle of crushed pecans.
For festive flair, torch mini marshmallows on top—instant Thanksgiving nostalgia.
Snap a photo because these babies are Pinterest gold. Then, enjoy one… or three.
Tips & Notes
- Room-Temp Ingredients: Cold cream cheese leads to lumps—let it soften fully.
- Don’t Skip the Pre-Bake: That crust-bake step is the line between crisp and soggy.
- Avoid Overmixing: Air bubbles make cracks; keep it calm.
- The Jiggle Test: Pull them when the center jiggles slightly. Overbaking kills creaminess.
- Cool Gradually: Rapid temperature changes cause cracks.
- Use Silicone Liners: You’ll thank yourself later when they pop out beautifully.
If you like smart baking shortcuts like these, check out our Hot Chocolate Pancakes Recipe — it uses the same “mix-smooth-chill” principle for perfect texture.
Make-Ahead & Storage
Make-Ahead: Bake the day before and chill overnight. The flavor deepens, and the texture firms into rich, bakery-quality cheesecake.
Refrigerate: Keep them in an airtight container for up to 4 days. Add toppings right before serving.
Freeze: Lay them on a tray until solid, then wrap individually. Thaw overnight in the fridge—texture stays creamy and smooth.
Party Hack: Freeze plain cups in advance, thaw the day before, then top with whipped cream just before serving for stress-free entertaining.
Variations
- Gingersnap Crust: Swap graham crumbs for gingersnaps or Biscoff for spiced snap and color contrast.
- Pecan Streusel Base: Mix ½ cup finely chopped pecans into your crust for nutty crunch.
- Maple Swirl: Add a swirl of maple syrup or caramel into the filling before baking—gorgeous marbled look, deeper sweetness.
- Pumpkin Swap: Use pumpkin puree instead of sweet potato for a classic autumn flavor. Reduce cinnamon slightly.
- Crustless Version: Skip the crust and bake the filling in ramekins. It’s naturally gluten-free and still delicious.
- Mini-Mini Style: Use a mini muffin pan for bite-size cheesecakes—bake for only 10 minutes!
Craving something ultra-seasonal? Try our Matcha Christmas Tree Pancakes for a festive breakfast pairing!
FAQs
1. Do I need a water bath like big cheesecakes?
Nope! These mini cups bake evenly without steam. Smaller portions = even heat = no water bath drama.
2. Can I use canned sweet-potato puree?
Totally! Just make sure it’s unsweetened and well-drained. Homemade mash gives a fresher taste, but canned saves time.
3. Why did my centers sink?
That’s usually from overbaking or over-mixing. Pull them when slightly jiggly; they’ll set as they cool.
4. Can I make these dairy-free?
Yes—swap vegan cream cheese and coconut cream for the dairy, and use coconut oil in the crust. They’ll still be rich and dreamy.
5. How can I make them less sweet?
Cut back one tablespoon of each sugar type or use maple syrup instead of granulated sugar for a milder, natural sweetness.
6. Can I add toppings before chilling?
Avoid it. Condensation will melt whipped cream and soften nuts. Always chill first, then top before serving.
7. What’s the best way to get smooth sweet-potato mash?
Roast the potatoes instead of boiling—they stay drier and naturally sweeter. Blend or mash while warm for silkiness.
Final Thoughts
There you have it: Sweet Potato Cheesecake Cups that are simple, elegant, and guaranteed to steal the dessert spotlight. Each bite is a perfect mix of buttery crust, creamy filling, and cozy fall spices.
These little cheesecakes are perfect for:
- Holiday gatherings: Everyone gets their own portion (and no messy slicing).
- Dinner parties: They look fancy but are secretly easy.
- Pinterest-ready moments: They photograph like a dream—especially with whipped cream swirls.
So preheat that oven, grab your muffin pan, and whip up a batch. They’re small enough to justify seconds… and thirds.
Sweet potatoes for dinner and dessert? We call that balanced living.

Sweet Potato Cheesecake Cups
Ingredients
For the Crust:
- 1 cup (100 g) graham cracker crumbs
- 3 tablespoons unsalted butter, melted
- 2 tablespoons light brown sugar
- Pinch of salt
For the Cheesecake Filling:
- 8 oz (226 g) cream cheese, softened to room temperature
- 1 cup mashed sweet potato (roasted or boiled, cooled and smooth)
- ¼ cup granulated sugar
- ¼ cup light brown sugar
- 1 large egg, room temperature
- 1 teaspoon vanilla extract
- ½ teaspoon ground cinnamon
- ¼ teaspoon ground nutmeg (optional)
- 1 tablespoon sour cream or Greek yogurt
- Pinch of salt
Optional Toppings:
- Whipped cream
- Crushed pecans or walnuts
- Maple syrup drizzle
- Toasted mini marshmallows
Instructions
Notes
- Sweet Potato Tip: Roast your sweet potatoes instead of boiling for a richer, sweeter flavor.
- Crust Options: Substitute gingersnaps or Biscoff cookies for extra spice and crunch.
- Dairy-Free: Use vegan cream cheese and coconut oil instead of butter for a dairy-free version.
- Make-Ahead: These cups can be made a day ahead and chilled overnight — flavor improves with time.
- Common Mistake: Don’t overbake! Pull them out when centers still have a slight jiggle for a creamy texture.
Nutrition Information:
Yield: 12Amount Per Serving: Calories: 210Total Fat: 11gSaturated Fat: 6gCarbohydrates: 22gFiber: 1gSugar: 14gProtein: 4g