
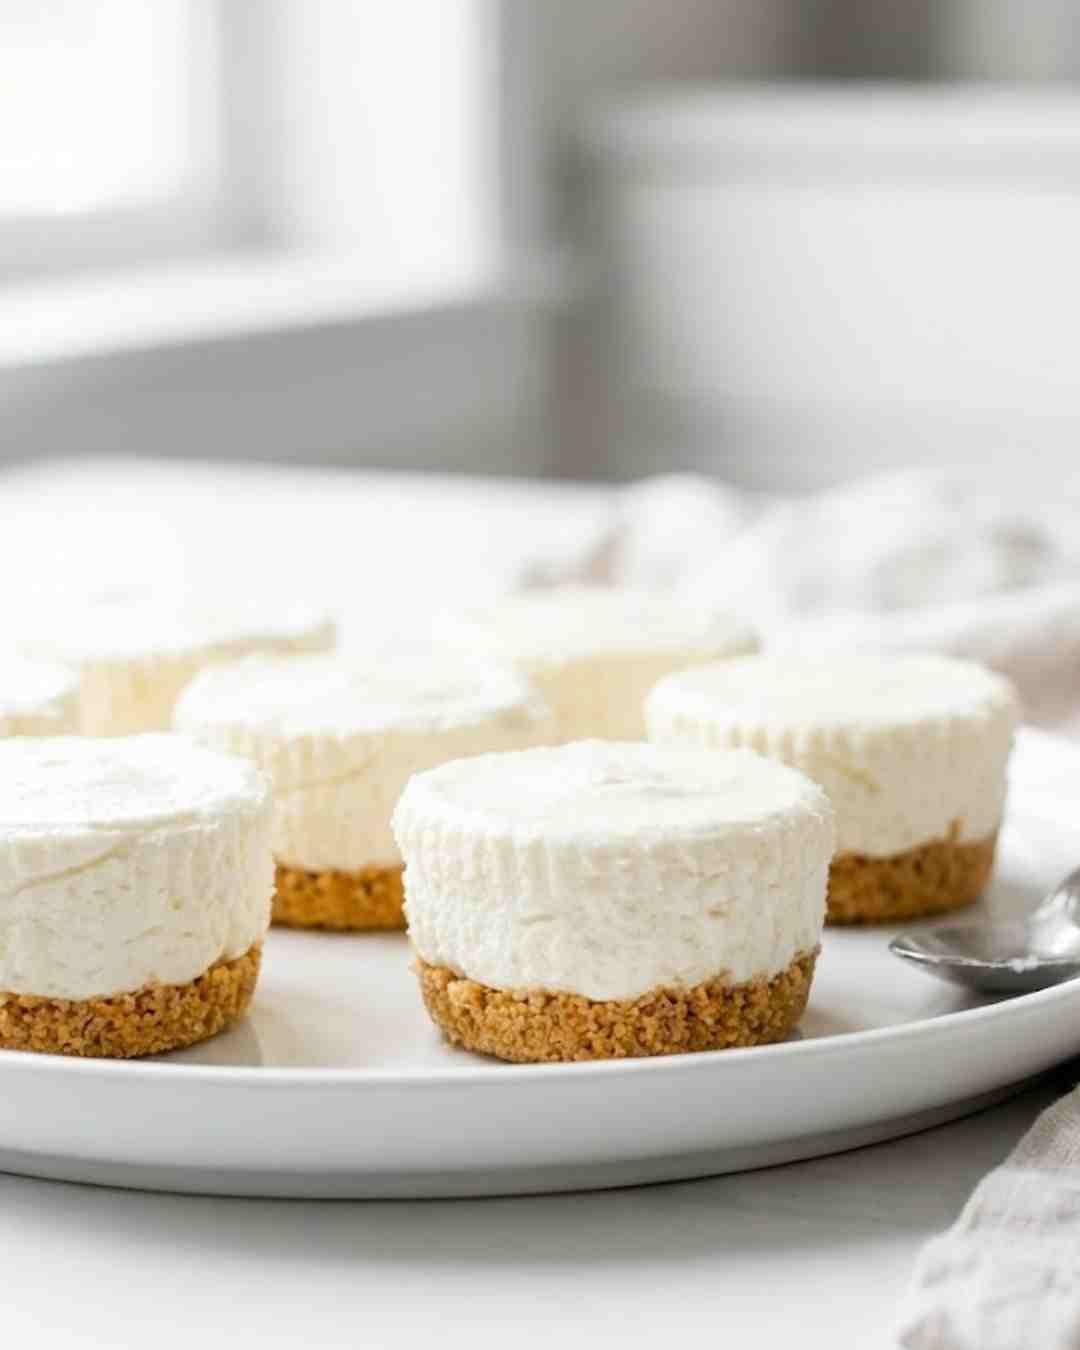
No Bake Mini Cheesecakes (Easy & Creamy Recipe!)
No bake mini cheesecakes are the answer to every late-night dessert craving that hits when you absolutely do not feel like turning on the oven. They’re creamy, fluffy, ridiculously easy, and honestly… a bit dangerous because you’ll want to eat like three of them before they even finish chilling. This is the kind of recipe that makes you feel like a dessert genius with almost no effort — mix, press, chill, and boom: instant cheesecake happiness.
You mix, you press, you chill — and boom. Dessert magic. No oven. No baking stress. No “why is my cheesecake weeping?” moments. Just perfect mini cheesecakes that make you want to show off a little.
Let’s get into it.
Why This Recipe Is Awesome
Mini no-bake cheesecakes deserve a standing ovation, and here’s why:
- No oven needed. Not today, not tomorrow, not ever.
- Foolproof for beginners. If you can stir, you can do this. No advanced baking degrees required.
- Perfect for portion control… or not. Eat one, or stack three like a dessert tower.
- Customizable like crazy. Berries? Caramel? Crushed Oreos? Mango? Pick your vibe.
- Make-ahead friendly. These get better after chilling, which means less stress for events and parties.
- The texture is unreal. Think mousse meets cheesecake — silky, fluffy, and light without losing richness.
- Cute enough for Pinterest. They’re mini. They’re adorable. They scream “pin me.”
If you want perfect edges and easy release, Fat Daddio’s Muffin Pan gives a professional finish.
These are the kind of cheesecakes you whip up once and suddenly everyone wants the recipe.
Ingredients You’ll Need for No-Bake Mini Cheesecakes
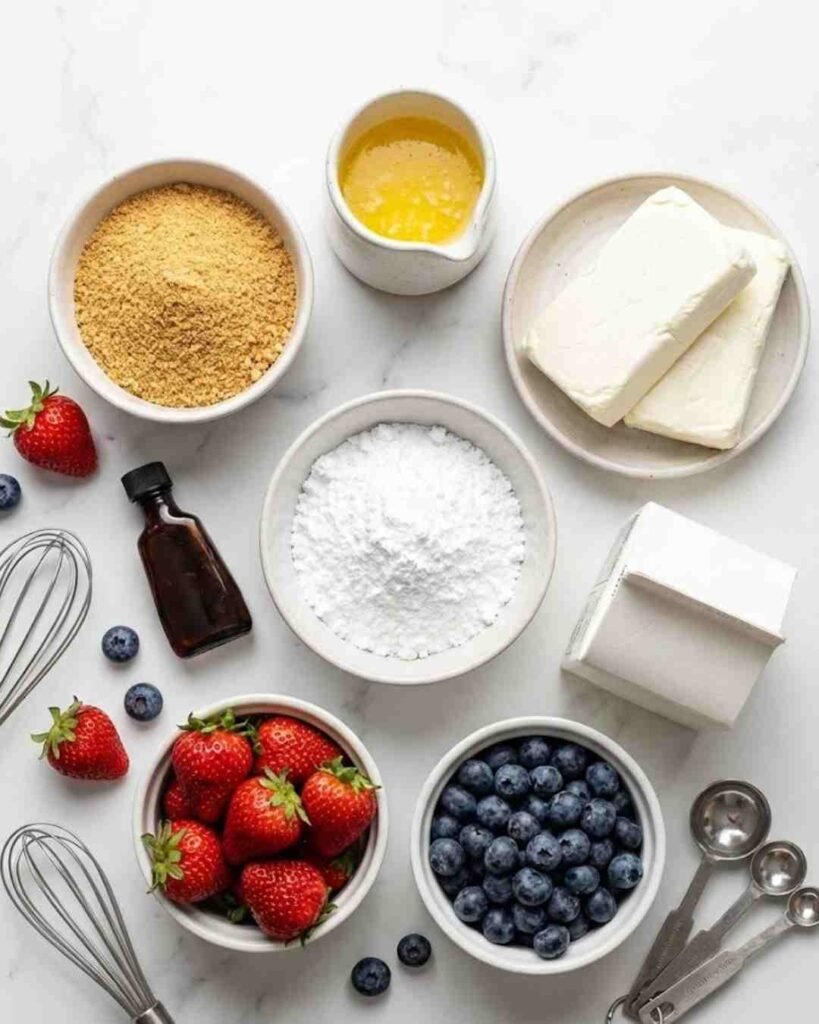
For the Crust
- 1 ½ cups graham cracker crumbs (or digestive biscuits, Biscoff, Oreos — whatever your heart desires)
- 5 tablespoons melted butter (your crust glue)
- 2 tablespoons granulated sugar (optional, but adds a little extra sweetness)
(Measuring everything accurately is simple with OXO Stainless Steel Measuring Cups, especially for beginners.)
For the Creamy Filling
- 1 cup cream cheese, softened
Make sure you use the brick-style full-fat cream cheese. Low-fat won’t give the same stability. - ¼ cup powdered sugar
Dissolves beautifully — no grainy texture. - 1 teaspoon vanilla extract
Because vanilla changes lives. - 1 cup cold heavy whipping cream
This is what makes the filling light and airy. - Pinch of salt
Optional, but enhances the flavor.
If you’ve made any of our jar desserts (like the No Bake Cheesecake in a Jar recipe), you’ll notice the ingredients here are super similar — which is great, because you probably already have most of them.
Toppings (Choose Your Personality)
- Fresh strawberries, raspberries, blueberries
- Mixed berry compote
- Lemon curd
- Oreo crumbs
- Caramel drizzle
- Chocolate ganache
- Coconut flakes
- Mango chunks
- Whipped cream swirls
Honestly, this part is pure creative freedom. Your toppings are the cheesecake’s outfit — dress them however you like.
Step-by-Step Instructions
Below are your steps with H4 headings, as requested.
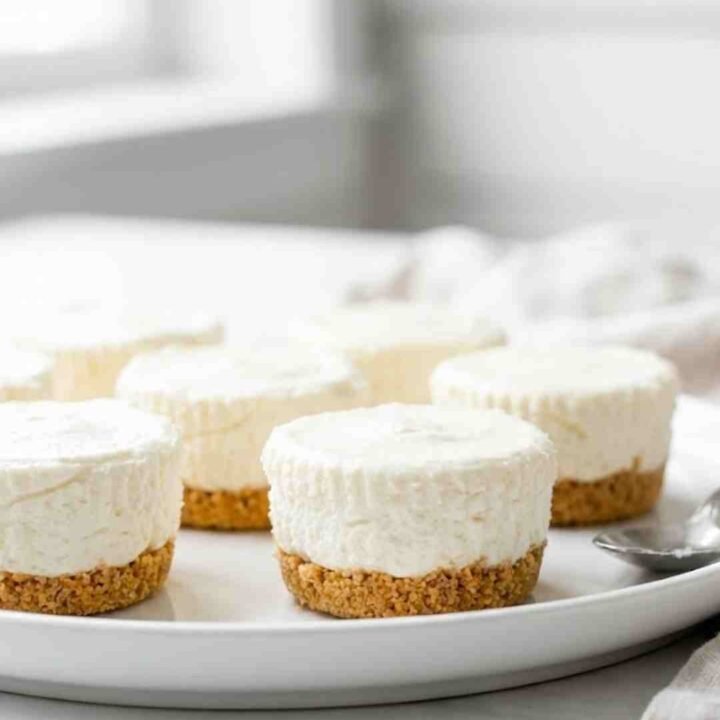
1. Line Your Muffin Pan
Grab a standard muffin tin and add cupcake liners (paper or silicone). Silicone liners are easier to unmold, but paper works great too. This is your base for perfectly shaped mini cheesecakes.If you prefer a cookie-style twist, try using crushed cookies like we do in our Gingerbread Latte Mousse Domes — it adds amazing flavor.
2. Make the Crust
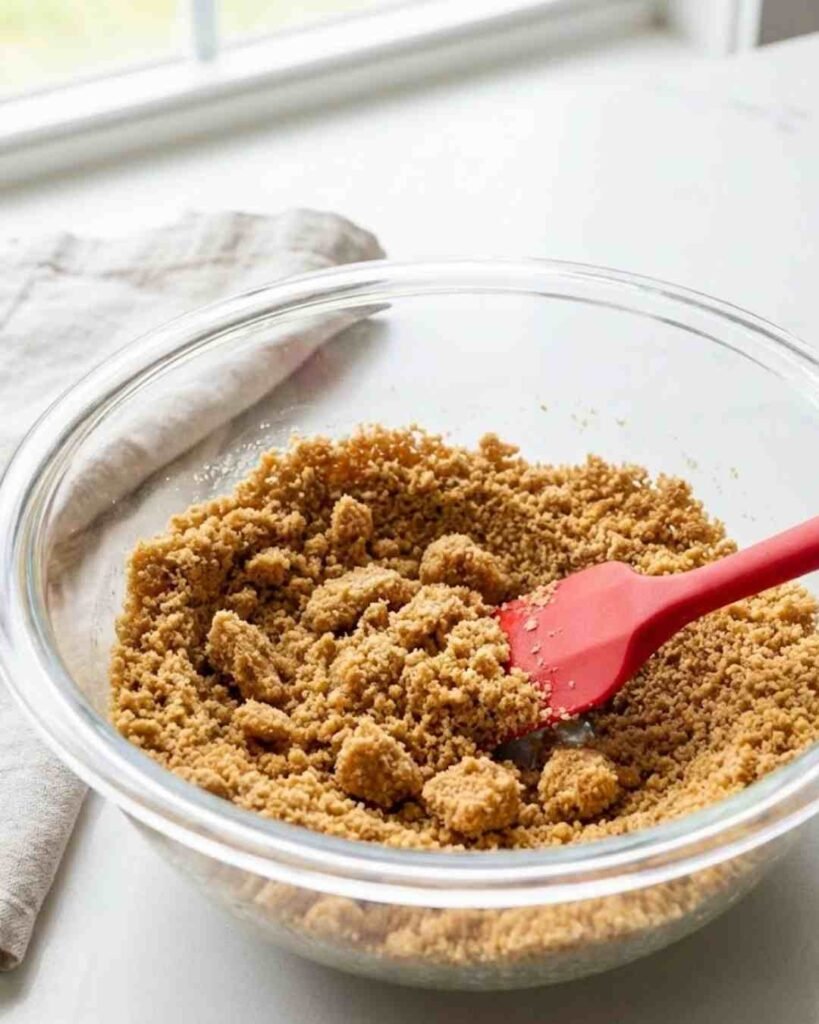
Mix together graham crumbs, melted butter, and sugar until it looks like wet sand from a beach vacation you wish you were on.
Spoon about 1–2 tablespoons into each liner and press down firmly using the bottom of a cup or your fingers.
The firmer the press, the more stable the crust — no one likes a crumbly, dramatic crust.
3. Whip the Cream
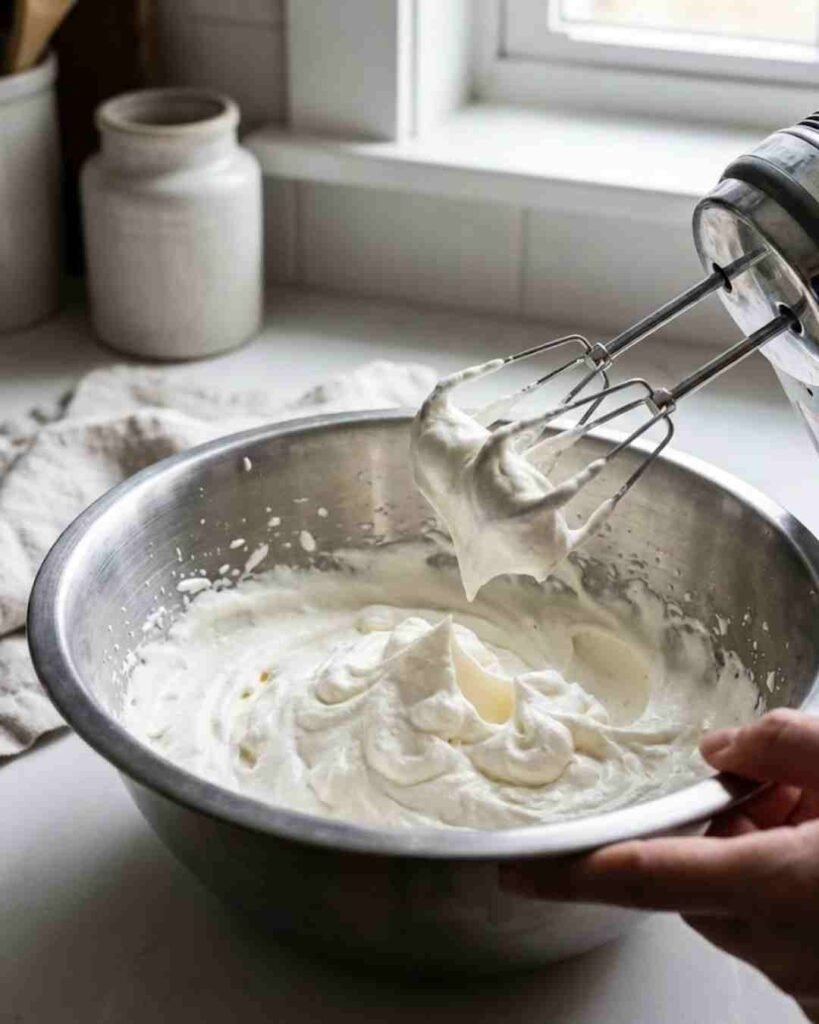
Pour cold heavy cream into a chilled bowl and whip it until stiff peaks form.
Stiff peaks = it stands up proudly when you lift the whisk.
This whipped cream is what makes the cheesecake filling light, airy, and mousse-like.
4. Prep the Cheesecake Base
In a separate bowl, beat softened cream cheese until smooth and silky.
Add powdered sugar, vanilla, and a tiny pinch of salt.
Beat again until the mixture is creamy, glossy, and free of lumps. If it’s lumpy, keep mixing — lumps are not invited to this party.
Smoothing the surface is super easy with an Ateco Offset Spatula, especially if you want a polished look.
5. Fold in the Whipped Cream
Gently fold the whipped cream into the cream cheese mixture using a spatula.
Fold, don’t stir — you’re trying to keep the airiness.
This step is basically tucking the whipped cream into bed.
6. Assemble the Cheesecakes

Spoon or pipe the filling over your crusts. Piping makes them Pinterest-level cute, but spooning works perfectly too.
Fill each cup almost to the top and smooth the surface if needed.
7. Chill to Set
Refrigerate your mini cheesecakes for at least 3–4 hours, or overnight for best results.
They need time to firm up — don’t rush this part.
The longer they chill, the better the texture.
8. Add Toppings and Serve
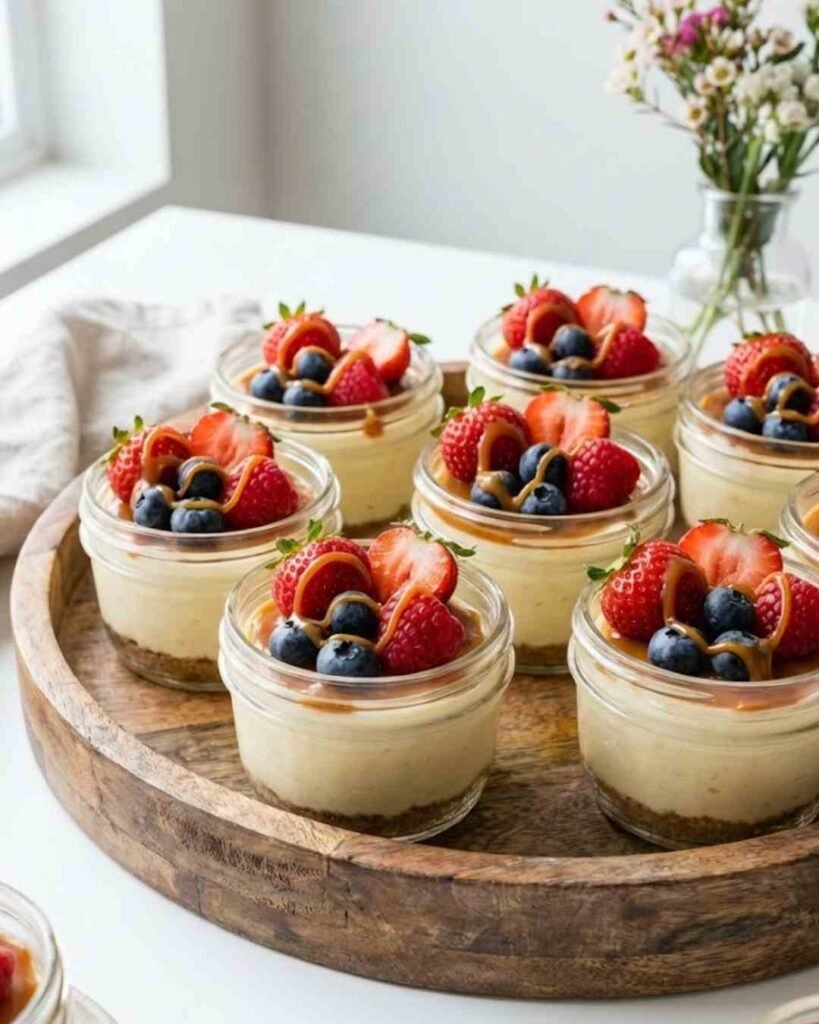
Once set, top your cheesecakes with fruit, chocolate, caramel, or whatever theme you’re going for.
This is the moment they go from “simple dessert” to “whoa, you made these??”
Snap a picture. Flex a little. Serve chilled and enjoy.
Common Mistakes to Avoid
Avoid these cheesecake tragedies and you’ll be golden:
- Using cold cream cheese.
It will never blend smoothly. Ever. Let it soften first. - Not whipping the cream enough.
Soft whipped cream = runny filling. You want stiff peaks. - Rushing the chill time.
I know you want to eat them ASAP. But warm cheesecake equals sadness. Chill them properly. - Pressing the crust too lightly.
If it crumbles like bad relationship advice, you didn’t press hard enough. - Adding watery toppings directly on top.
If your fruit is too juicy, dab it with a paper towel first. No one wants cheesecake soup. - Overmixing after adding whipped cream.
You’ll deflate all the fluffiness. Fold gently, like you’re handling fragile dessert treasure.
Alternatives & Substitutions
No stress if you’re missing ingredients — cheesecake is flexible.
Crust Swaps
- Biscoff cookies → caramelized, crispy, the dream
- Oreos → skip the sugar, the cookies are sweet enough
- Digestive biscuits → classic
- Gluten-free cookies → easy swap for allergies
Filling Swaps
- Greek Yogurt Cheesecake
Sub half the cream cheese with yogurt for a tangier, lighter version. - Chocolate Cheesecake
Add ½ cup melted (cooled) chocolate to the cream cheese before folding in the whipped cream. - Lemon Cheesecake
Add 2 tablespoons lemon juice + lots of lemon zest for bright, summery flavor.
Toppings Swaps
- Berry lover? Fresh berries + berry sauce.
- Chocolate lover? Ganache, chocolate curls, cocoa dust.
- Caramel fan? Salted caramel + a sprinkle of sea salt = chefs kiss.
- Tropical mood? Mango + coconut flakes.
Basically, this recipe is your blank dessert canvas.
Want a jar version? Try our Healthier No-Bake Cheesecake in a Jar for a tangier, yogurt-based twist. Or, if you want a fruity pairing, our Strawberry Blueberry Smoothie complements these cheesecakes perfectly.
FAQ (Frequently Asked Questions)
1. Can I make these in jars instead of a muffin pan?
Absolutely. Mini jars, mason jars, ramekins — they all work. Jar cheesecakes actually travel really well.
2. Do mini no-bake cheesecakes freeze well?
Yep! Freeze without toppings. Thaw in the fridge.
They turn into cheesecake ice cream cups. Pure happiness.
3. How long do they last in the fridge?
They stay perfect for 3–4 days. After that, the crust may soften, but they’ll still be tasty.
4. My filling seems too runny. What did I do wrong?
Either the cream wasn’t whipped enough or you used low-fat cream cheese. Chill longer to help it firm up.
5. Can I make them sugar-free?
Totally.
Use powdered erythritol or monk fruit and sugar-free cookies for the crust.
6. My crust is crumbling — help!
You either used too little butter or didn’t press firmly enough.
Next time, add 1 extra tablespoon of melted butter if needed.
7. Can I double the recipe for parties?
Absolutely yes. Cheesecakes are crowd-pleasers. Just make sure your fridge has space.
Final Thoughts
Mini no-bake cheesecakes are the kind of dessert you make once and instantly regret… because now everyone will ask you to bring them to every family event, friend gathering, holiday, birthday, and random Tuesday.
They’re easy. They’re creamy. They’re cute. They’re customizable.
And honestly? They taste like you put way more effort in than you actually did.
Now go make a batch, chill them, top them with something pretty, and enjoy your new dessert superpower. And hey — if you post them on Pinterest, flex a little. You earned it.
No Bake Mini Cheesecakes
These no bake mini cheesecakes are creamy, fluffy, and incredibly easy to make—perfect when you want a delicious dessert without turning on the oven. With a buttery graham crust and a silky whipped filling, they’re the ideal make-ahead treat for parties, gatherings, or late-night cravings.
Ingredients
For the Crust
- 1 ½ cups graham cracker crumbs
- 5 tablespoons melted butter
- 2 tablespoons granulated sugar (optional)
For the Filling
- 1 cup cream cheese, softened (brick-style, full-fat)
- ¼ cup powdered sugar
- 1 teaspoon vanilla extract
- 1 cup cold heavy whipping cream
- Pinch of salt (optional, enhances flavor)
Optional Toppings
- Fresh berries (strawberries, blueberries, raspberries)
- Lemon curd
- Crushed Oreos
- Caramel drizzle
- Chocolate ganache
- Whipped cream
Instructions
- Prepare the muffin pan: Line a standard 12-cup muffin tin with paper or silicone liners.
- Make the crust: In a bowl, mix graham crumbs, melted butter, and sugar until the texture resembles wet sand.
- Press the crust: Add 1–2 tablespoons of crust mixture into each liner and press firmly to create an even base.
- Whip the cream: In a chilled bowl, whip the heavy cream until stiff peaks form.
- Make the filling: In another bowl, beat softened cream cheese until smooth. Add powdered sugar, vanilla, and salt, then mix until creamy.
- Fold together: Gently fold the whipped cream into the cream cheese mixture until fully combined and fluffy.
- Assemble: Spoon or pipe the mixture evenly over the crusts, filling each cup nearly to the top.
- Chill: Refrigerate for at least 3–4 hours, or until set.
- Serve: Add your favorite toppings and enjoy chilled.
Notes
Nutrition Information:
Yield: 12Amount Per Serving: Calories: 210Total Fat: 15gCarbohydrates: 15gFiber: 0.2gSugar: 11gProtein: 2g