
Healthy No-Bake Oreo Cheesecake Bites | Easy Mini Cheesecakes
You know that craving that hits out of nowhere — the “I need dessert right now but don’t you dare ask me to turn on the oven” feeling? Yep. That’s exactly why Healthy No-Bake Oreo Cheesecake Bites exist. Creamy, chocolatey, perfectly portioned, and ridiculously easy, they’re the type of dessert you can whip up in minutes and flex like you spent all afternoon making them.
They’re everything you love about Oreo cheesecake… just lighter, faster, and way more fun. Grab a bowl, some cupcake liners, drop in a cookie, and let’s make magic.
Why These Healthy No-Bake Oreo Cheesecake Bites Are Awesome
You’re not just making dessert — you’re making tiny cups of joy. Here’s why this recipe deserves a lifetime spot in your snack lineup:
- No baking at all. Your oven stays asleep — amazing for hot days, lazy days, or “I only have 12 minutes” days.
- Healthier than traditional cheesecake. Greek yogurt replaces heavy cream for a lighter but still creamy texture.
- Super customizable. Golden Oreos? Mint Oreos? Protein yogurt? Yep, go wild.
- Perfect for portion control. Each cup is small enough to keep things balanced… or to justify eating three. No judgment here.
- Great for parties, meal prep, or midnight snacking. They chill well, freeze well, and somehow taste even better the next day.
- Beginner-friendly. If you can stir, you’re overqualified.
If you love easy desserts, a KitchenAid Hand Mixer makes the mixing part almost effortless.
This is one of those recipes that makes you look like you have your life together — even if your sink is full and your laundry is silently judging you.
Want more quick no-bake treats? Try my Healthier No-Bake Cheesecake in a Jar.
Ingredients You’ll Need
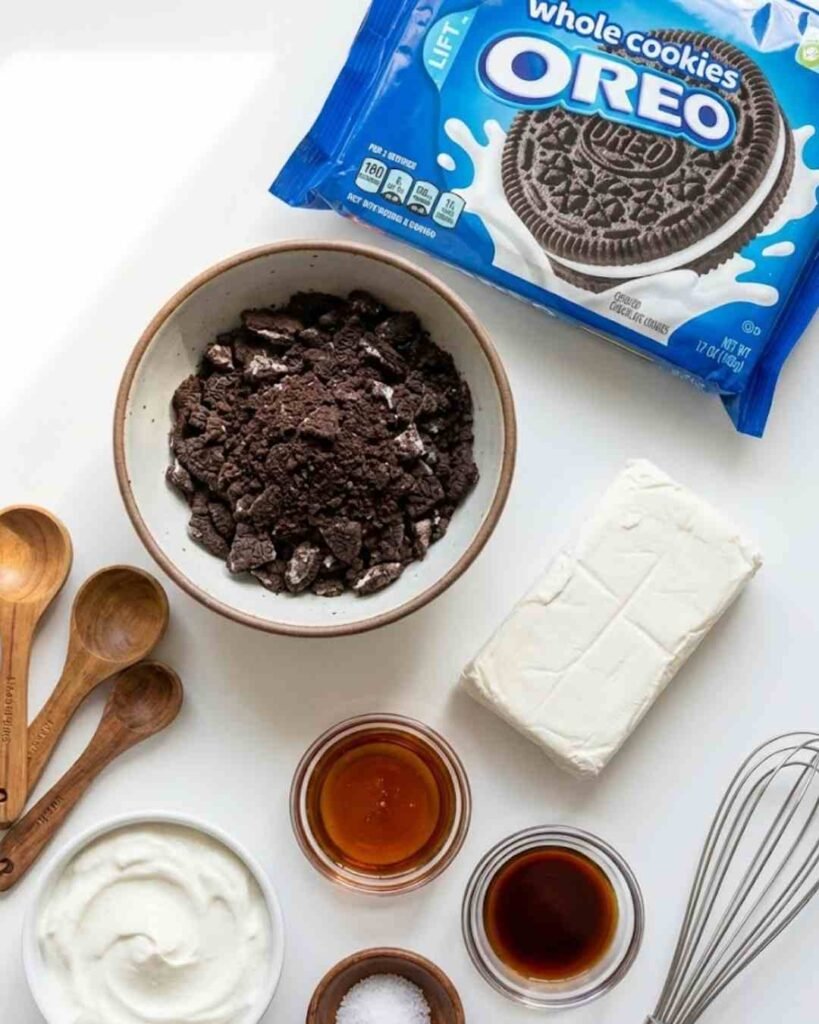
Nothing strange, nothing complicated — just the essentials:
- 8–10 Oreo cookies — whole + crushed for the filling
- 4 oz cream cheese, softened — full-fat gives the dreamiest texture
- 1 cup Greek yogurt — plain or vanilla
- 2–3 tbsp maple syrup or honey — sweeten to taste
- 1 tsp vanilla extract
- Pinch of salt
- Optional mix-ins: chocolate chips, crushed nuts, berries
- Optional toppings: extra Oreo crumbs, shaved chocolate, melted chocolate drizzle
- Shortcut: Oreo Thins work just as well for a lighter version.
If you enjoy simple ingredient lists like this, you’ll love how minimalist my Best Waffle Recipe is.
Step-by-Step Instructions
Time to bring these no-bake cheesecake cups to life! Follow these steps and don’t be afraid to sneak a taste.
1. Prep the Oreo Bases
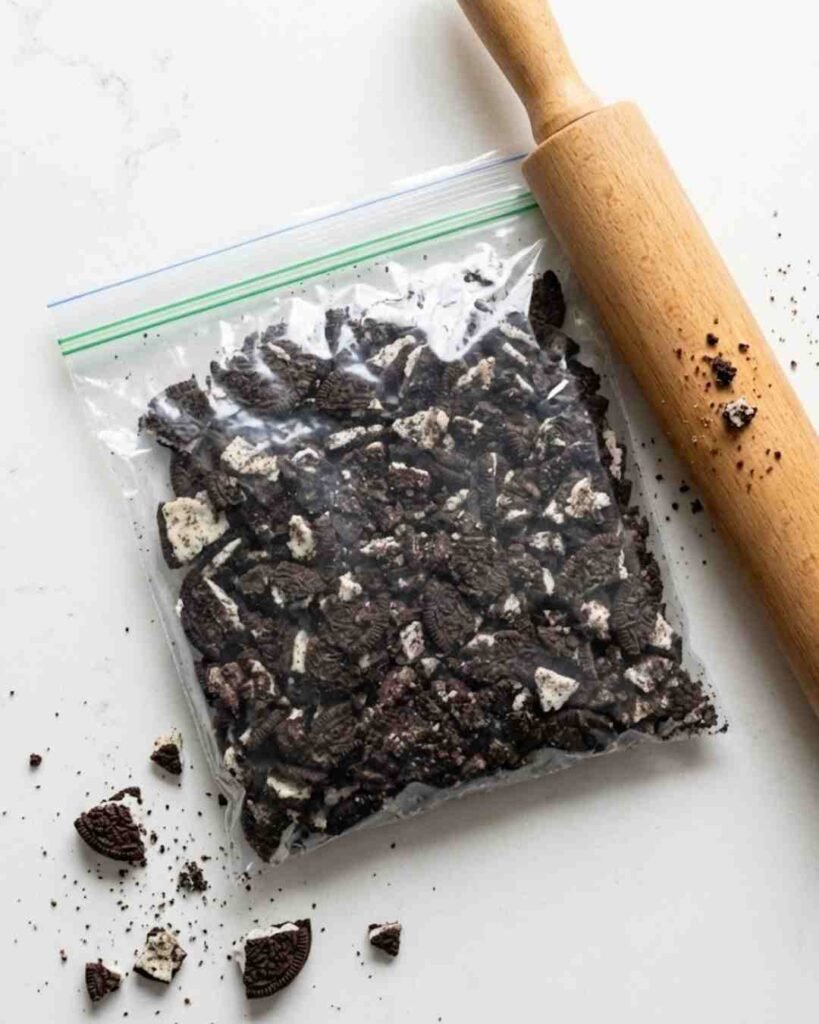
Line a muffin pan with cupcake liners and drop one whole Oreo cookie into the bottom of each liner — this becomes your base.
Crush 3–4 extra Oreos in a zip-top bag with a rolling pin.
If you want consistent crumbs every time, a compact tool like the Ninja Mini Food Processor gets the job done fast.
2. Whip the Cream Cheese
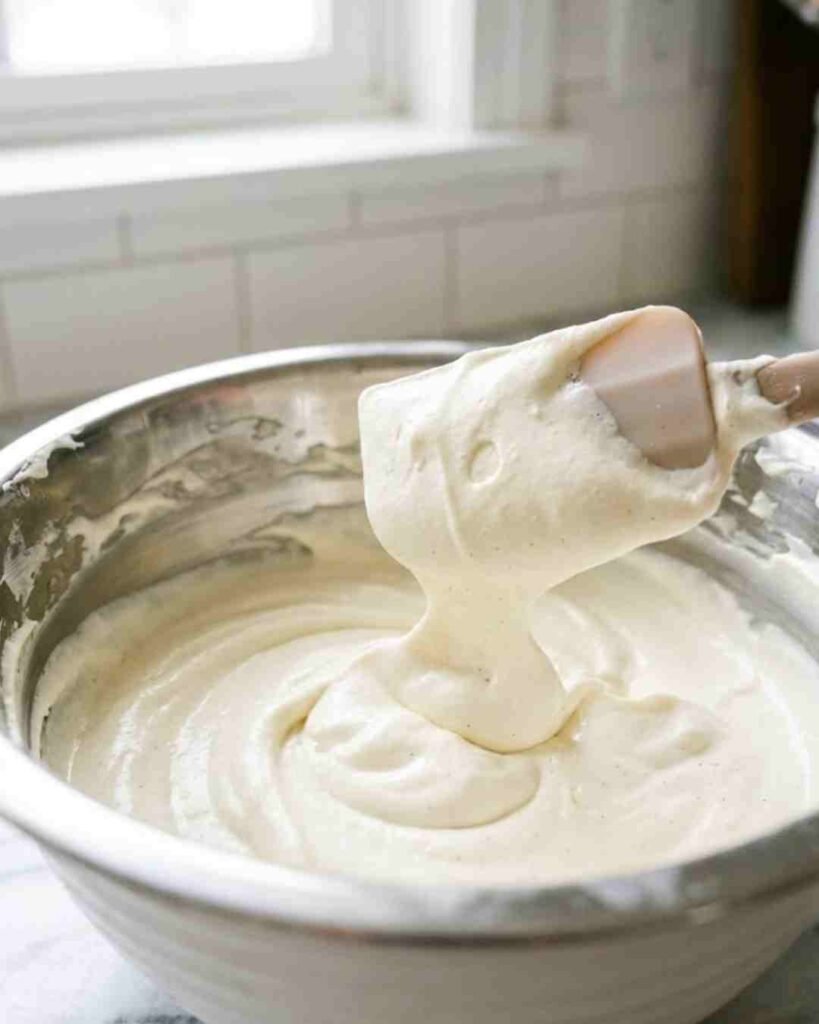
In a bowl, beat softened cream cheese until smooth and creamy.
This is where lumps love to hide, so room temperature is key.
If you skip softening it, you’ll spend forever fighting tiny little clumps.
3. Add the Greek Yogurt & Sweetener
Add Greek yogurt, maple syrup (or honey), vanilla, and a pinch of salt.
Mix until light, fluffy, and silky smooth.
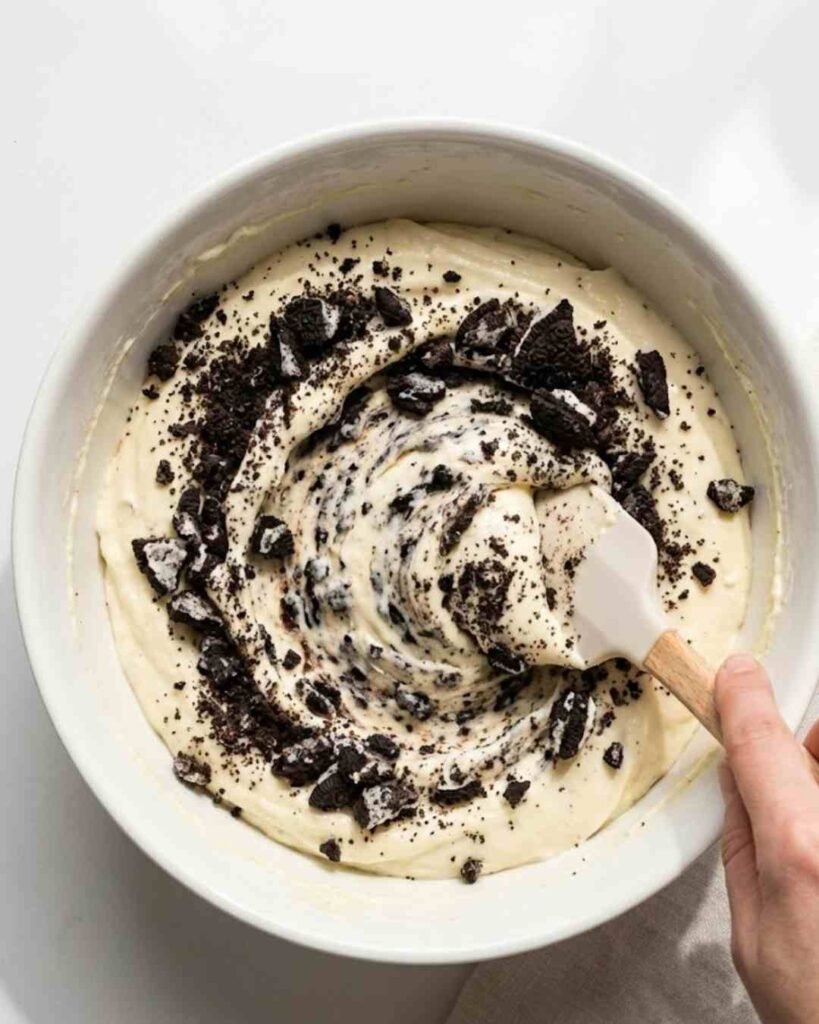
Fold in the crushed Oreos gently — this is how you get that perfect cookies-and-cream texture.
4. Fill the Cupcake Liners
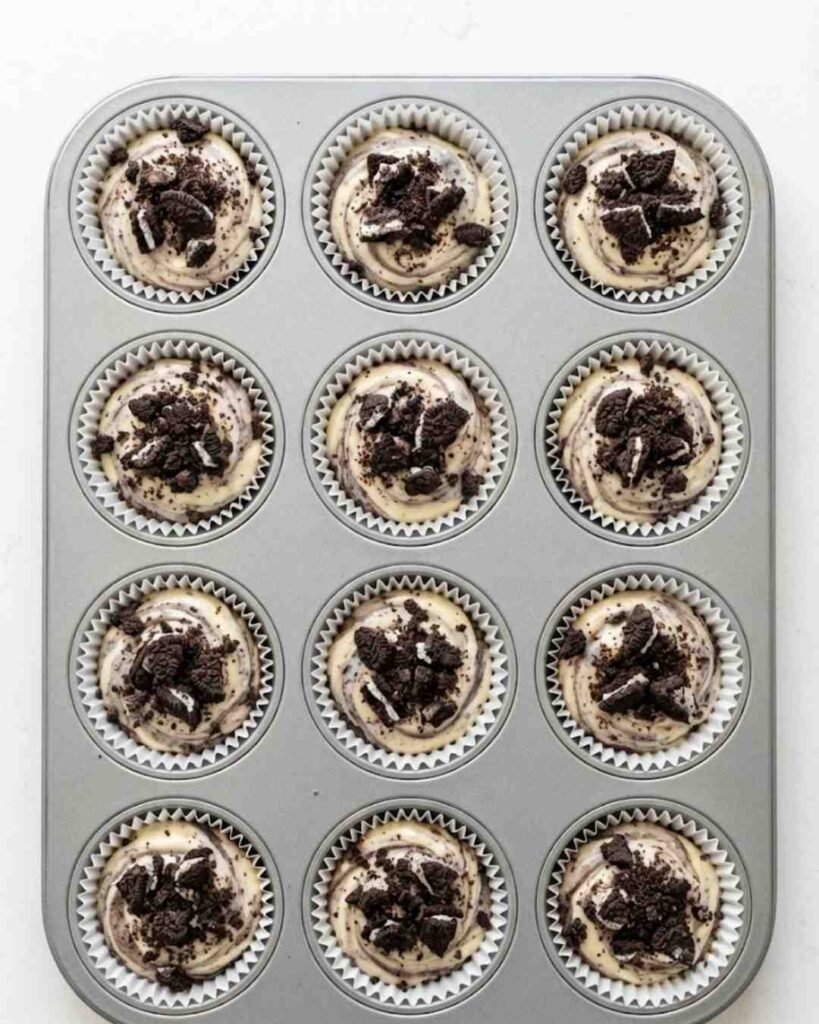
Spoon the creamy mixture over each Oreo base, filling each liner to the top.
Use the back of a spoon to smooth the tops if you want a cleaner look.
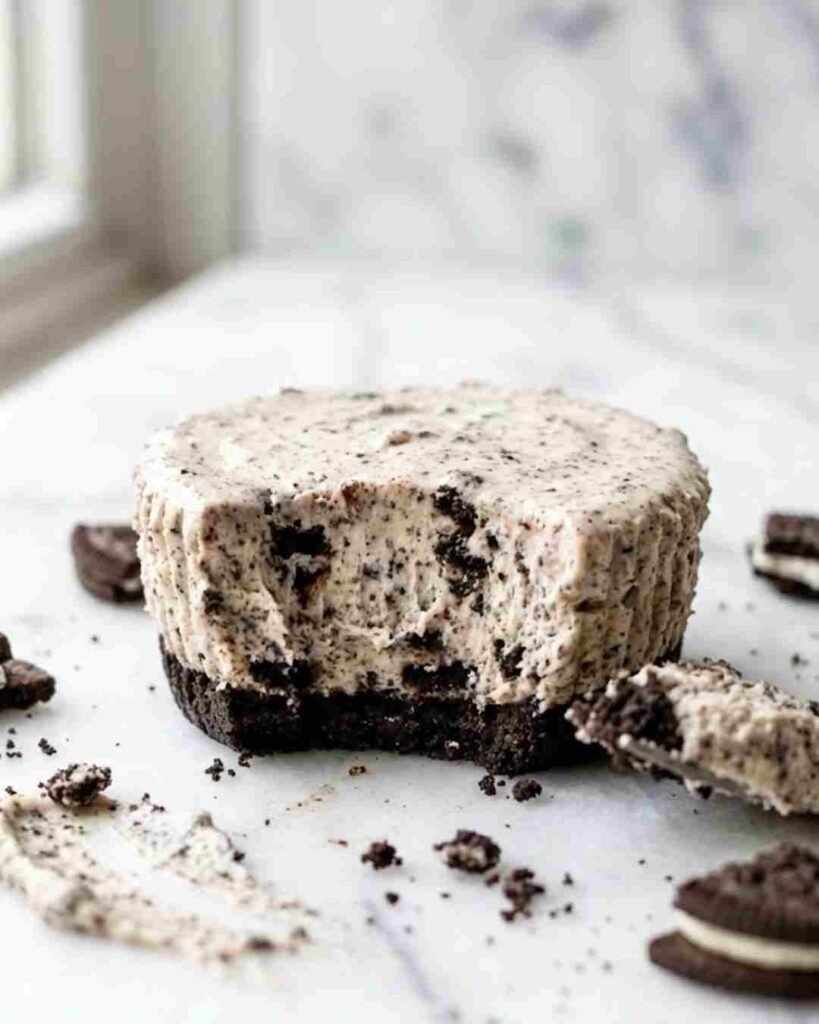
5. Chill Until Firm
Pop the muffin pan in the fridge for 2–3 hours or in the freezer for 45–60 minutes.
This step is non-negotiable — the bites need time to set.
Think of this as letting your dessert take a cute little spa day.
A sturdy Airtight Meal Prep Container helps keep them fresh during chilling.
6. Add Optional Toppings (If You Want to Be Fancy)
Once chilled, top with:
- extra Oreo crumbs
- chocolate drizzle
- berries
- coconut shavings
Or keep them classic. Either way, they’re gorgeous.
For a fruity twist with these, serve alongside my Easy Strawberry Blueberry Smoothie.
Common Mistakes to Avoid
Even simple recipes can go sideways. Here’s how to avoid rookie mistakes:
- Using cold cream cheese. You’ll end up with lumps that haunt your dreams.
- Rushing the chilling time. If you grab them too early, they’ll collapse like a toddler at 8 pm.
- Too many Oreos. I know, blasphemy — but it can dry out the filling.
- Overmixing. You’ll lose the cookies-and-cream speckled texture.
- Too much yogurt. Makes the mixture too soft to set properly.
A reliable Digital Kitchen Scale helps keep measurements spot-on every time.
Follow these and your bites will come out looking like something straight from a bakery — or at least something you’ll want to brag about on Instagram.
Alternatives & Substitutions
Want to switch things up? Here’s how to customize your cheesecake cups:
Swap the Oreos
Try:
- Golden Oreos
- Mint Oreos
- Peanut Butter Oreos
- Sugar-free Oreos
- Chocolate graham crackers
Each gives a totally new personality.
Make It Dairy-Free
Use:
- dairy-free cream cheese
- coconut yogurt
- gluten-free sandwich cookies
Boom — inclusive dessert.
Protein-Packed Version
Swap or add:
- protein yogurt
- vanilla protein powder
- high-protein pudding
A dessert you can flex.
TikTok-Level Fancy Version
- use silicone molds for perfect shapes
- add melted white chocolate drizzle
- make cheesecake bars instead of cups
- swirl in peanut butter or berries
Pair it with my refreshing Easy Strawberry Blueberry Smoothie for a perfect combo.
Storage & Serving Suggestions
Storing these little cheesecake miracles is honestly the easiest part — and they somehow taste even better the next day.
How to Store in the Fridge
Place them in an airtight container and refrigerate for 4–5 days.
They stay firm, creamy, and dangerously snackable.
How to Store in the Freezer
For long-term dessert security:
- Lay bites on a tray and freeze 1 hour.
- Transfer to a freezer-safe container or bag.
They keep 1–2 months.
Let them thaw for 10 minutes for a perfect “mini ice-cream-cheesecake” vibe.
Best Way to Serve Them
- Serve chilled for a firm bite.
- Leave them out 3–5 minutes for a creamier texture.
- Add berries or chocolate drizzle if you’re feeling extra.
Meal Prep Tip
Freeze them in batches and keep a few in the fridge at all times.
It’s basically emergency dessert prep — and honestly, everyone should do it.
FAQ (Frequently Asked Questions)
1. Do these taste like real cheesecake?
Shockingly yes — they’re lighter, but the flavor is totally cheesecake-approved.
2. Can I make them ahead?
Absolutely. They’re practically built for meal prep.
3. Can I skip the cream cheese?
You can, but then it becomes Oreo yogurt cups. Still great — just different.
4. Why are my bites too soft?
Either not enough chilling or too much yogurt. Stick to the measurements.
5. Can I double or triple the recipe?
Yes. Always yes.
6. What if I don’t have Greek yogurt?
Use sour cream or whipped heavy cream for a richer texture.
7. Full-fat or light cream cheese?
Full-fat = richer, smoother bites.
Light cream cheese works but may be slightly softer.
Final Thoughts
And there you go — a batch of creamy, dreamy, healthier No-Bake Oreo Cheesecake Bites that look bakery-fancy but take almost no effort. Whether you’re prepping snacks for the week, hosting friends, or just treating yourself (as you should), these cheesecake cups always come through.
No oven. No stress. Just pure Oreo joy.
Now grab those cookies and get mixing — your future self is going to thank you.
Healthy No-Bake Oreo Cheesecake Bites
These Healthy No-Bake Oreo Cheesecake Bites are creamy, light, and irresistibly chocolatey—made with Greek yogurt instead of heavy cream for a healthier twist. No oven required, no fuss, just simple ingredients that transform into the perfect portion-controlled dessert. A quick, fun, and delicious recipe that satisfies any Oreo cheesecake craving in minutes!
Ingredients
- 12 Oreo cookies (1 per cup, plus extras for crushing)
- 4 oz cream cheese, softened
- 1 cup Greek yogurt (plain or vanilla)
- 2–3 tbsp maple syrup or honey (to taste)
- 1 tsp vanilla extract
- Pinch of salt
- Optional Mix-Ins: chocolate chips, crushed nuts, or fresh berries
- Optional Toppings: extra Oreo crumbs, shaved chocolate, or chocolate drizzle
Instructions
- Prep your bases: Line a muffin pan with cupcake liners and place one whole Oreo cookie at the bottom of each cup.
- Crush extra Oreos: Place 3–4 cookies in a zip-top bag and crush with a rolling pin until crumbly.
- Beat cream cheese: In a mixing bowl, whip softened cream cheese until smooth and lump-free.
- Add yogurt & flavor: Mix in Greek yogurt, maple syrup (or honey), vanilla extract, and a pinch of salt until creamy and fluffy.
- Fold in Oreos: Gently fold crushed Oreos into the mixture without overmixing.
- Fill the cups: Spoon the mixture over each Oreo base, filling liners to the top. Smooth the surface if desired.
- Chill to set: Refrigerate for 2–3 hours or freeze for 45–60 minutes until firm.
- Add toppings: Finish with extra crushed Oreos, chocolate drizzle, or berries before serving.
Notes
- Prep your bases: Line a muffin pan with cupcake liners and place one whole Oreo cookie at the bottom of each cup.
- Crush extra Oreos: Place 3–4 cookies in a zip-top bag and crush with a rolling pin until crumbly.
- Beat cream cheese: In a mixing bowl, whip softened cream cheese until smooth and lump-free.
- Add yogurt & flavor: Mix in Greek yogurt, maple syrup (or honey), vanilla extract, and a pinch of salt until creamy and fluffy.
- Fold in Oreos: Gently fold crushed Oreos into the mixture without overmixing.
- Fill the cups: Spoon the mixture over each Oreo base, filling liners to the top. Smooth the surface if desired.
- Chill to set: Refrigerate for 2–3 hours or freeze for 45–60 minutes until firm.
- Add toppings: Finish with extra crushed Oreos, chocolate drizzle, or berries before serving.
Nutrition Information:
Yield: 12Amount Per Serving: Calories: 145Total Fat: 7gCarbohydrates: 17gFiber: 0,7gSugar: 12gProtein: 4g