
Creamy Smothered Chicken and Rice (Easy One-Pan Dinner)
You ever have one of those days where you don’t want a fancy meal… you want a “curl-up-on-the-couch-with-a-bowl” meal? The kind that’s warm, creamy, comforting, and makes your kitchen smell like you’ve been cooking all day—even though you absolutely did not?
That’s exactly what Creamy Smothered Chicken and Rice is here to do. Juicy chicken. Fluffy rice. Rich, creamy sauce that wraps around every bite like a cozy blanket. And the best part? It all happens in one pan. One pan. One sink. One very happy you.
Let’s make dinner feel like a warm hug.
Why You’ll Love This Creamy Smothered Chicken and Rice Recipe
First of all… it’s one-pan magic. No juggling multiple pots. No pasta water boiling over. No mountain of dishes waiting for you afterward like a personal attack. Just one pan doing all the heavy lifting.
Second, this recipe hits every comfort food checkpoint:
- Creamy? ✅
- Savory? ✅
- Filling? ✅
- Makes people quiet at the dinner table? Also
Third, it’s made from real, normal ingredients. Nothing mysterious. Nothing expensive. Just chicken, rice, broth, cream, and a few flavor boosters you probably already own.
And finally—it’s forgiving. Burned your rice a little? We can save it. Sauce too thick? Easy fix. Chicken cooked faster than expected? No panic required. This recipe wants you to win.
If you enjoy comforting, cozy baking too, don’t miss our Honey Vanilla Banana Bread—perfect for dessert after this meal.
What You’ll Need (Ingredients)
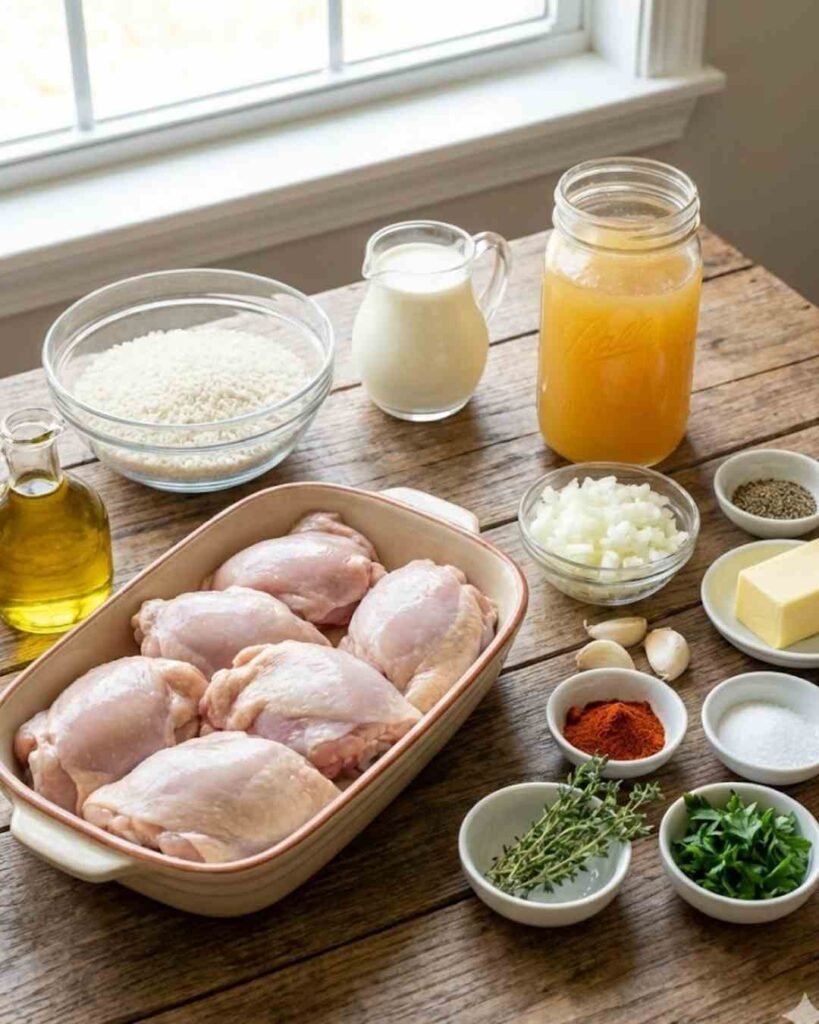
No scavenger hunt at the grocery store today. Here’s your lineup:
- Boneless, skinless chicken thighs or breasts – Thighs stay extra juicy, breasts stay extra lean. You choose your fighter.
- Long-grain white rice – Reliable. Fluffy. Drama-free.
- Chicken broth – This builds real flavor. Water would be rude here.
- Heavy cream – The heart and soul of the sauce. Respect it.
- Onion, diced – Sweet, savory base flavor.
- Garlic, minced – Because not adding garlic should be illegal.
- Butter – For richness and flavor.
- Olive oil – For searing the chicken without burning the butter.
- Paprika – Adds warmth and color.
- Italian seasoning or thyme – Lazy herb blend for easy flavor.
- Salt & black pepper – Obviously essential.
Optional upgrades (not required, but fun):
- Mushrooms
- Frozen peas or spinach
- Shredded cheddar or parmesan
- A pinch of chili flakes for heat
If you’re into balanced, protein-packed meals, you may also enjoy our Protein Pancake Bowl for breakfast or brunch.
Step-by-Step Instructions
Each step is short, clear, and built for real kitchens—not TV kitchens. Follow along and you’ll be eating something incredible very soon.
Step 1: Season the Chicken
Pat the chicken dry and season both sides with salt, pepper, paprika, and Italian seasoning. This is your foundation. Under-seasoned chicken leads to sad meals, and we’re not here for that.
Real-life tip: Season more than you think. Creamy dishes need extra seasoning to stay bold.
Using a sturdy set of OXO Good Grips Mixing Bowls makes seasoning the chicken cleaner and keeps spices from flying everywhere.
Step 2: Sear the Chicken
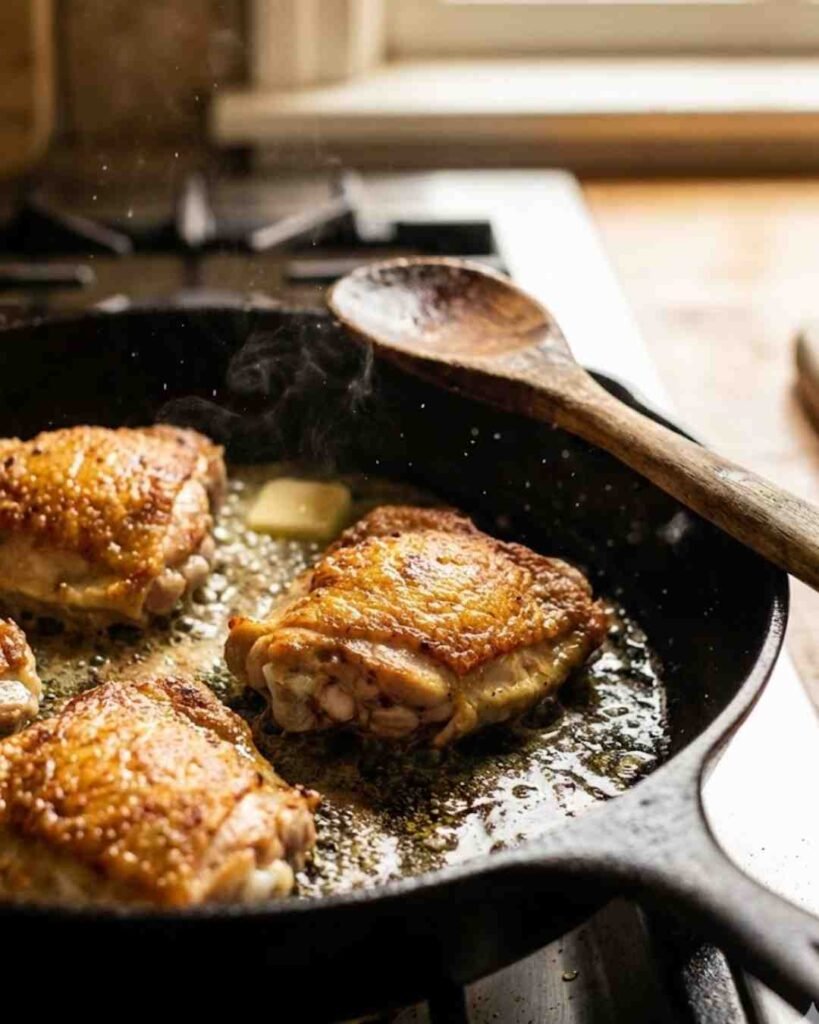
Heat olive oil and butter in a large skillet over medium-high heat. Add the chicken and let it sear until golden brown on both sides—about 4–5 minutes per side. You’re not cooking it through yet—just building flavor.
Remove the chicken and set it aside.
Don’t rush this step. That crust = flavor insurance.
A heat-resistant OXO Silicone-Turner Spatula makes flipping the chicken easy without tearing that golden crust.
Step 3: Sauté the Onion & Garlic
In the same pan (yes, same pan—do not wash it), add a bit more butter if needed. Toss in the diced onion and cook until soft and slightly golden. Add the garlic and cook for about 30 seconds.
Your kitchen should now smell like “someone who knows how to cook” lives here.
Step 4: Toast the Rice
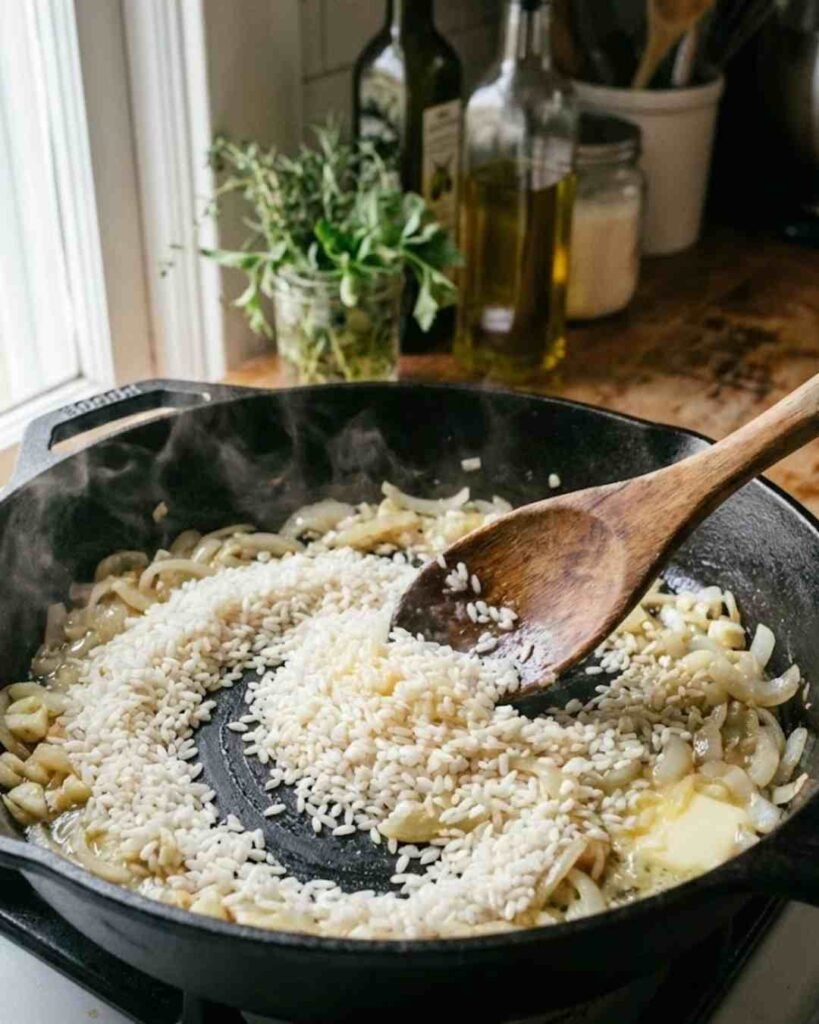
Stir the uncooked rice directly into the onion and garlic. Let it toast for about one minute, coating every grain in that buttery goodness.
This step adds subtle nutty flavor and helps prevent mushy rice later.
Step 5: Add Broth & Cream
Pour in the chicken broth followed by the heavy cream. Stir gently to combine everything and bring it to a soft simmer.
At this point, you’ll start questioning why restaurants even exist.
Step 6: Return the Chicken
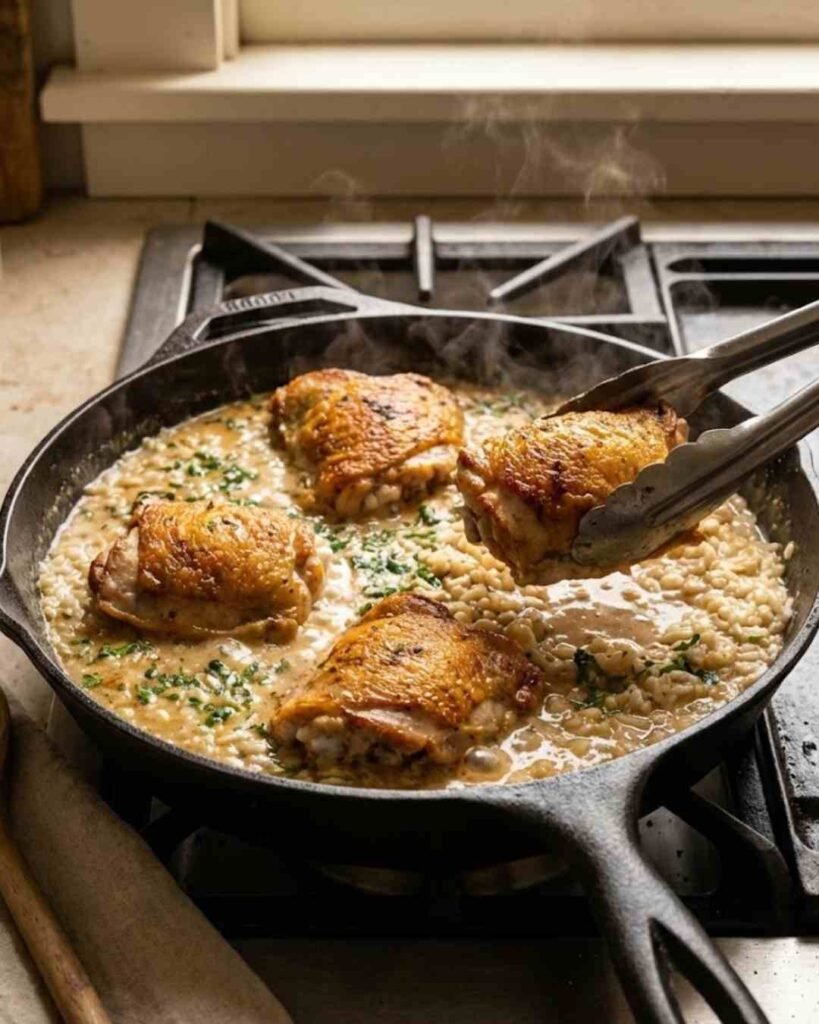
Nestle the seared chicken back into the pan right on top of the rice. Lower the heat, cover, and let everything simmer gently for 20–25 minutes, or until the rice is tender and the chicken is cooked through.
Peek once or twice. Stir only if needed to prevent sticking.
A tight-fitting lid like the one on the All-Clad Stainless Steel Skillet helps trap steam so the rice cooks evenly without drying out.
Step 7: Optional Cheese Finish

If you’re going the cheesy route (highly encouraged), sprinkle shredded cheese on top, cover again, and let it melt for 2–3 minutes.
Emotionally prepare yourself.
Step 8: Rest & Serve
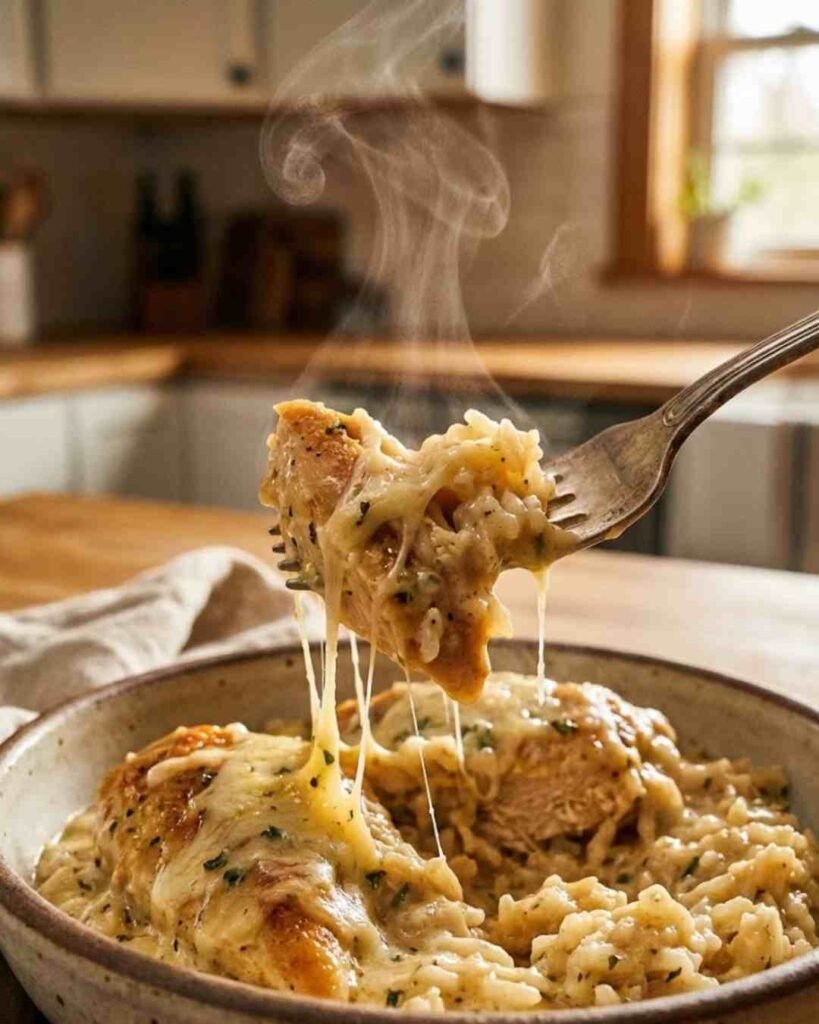
Turn off the heat and let the dish rest for 5 minutes. The sauce thickens slightly and everything settles into creamy perfection.
Then serve it hot and accept your compliments.
Variations & Substitutions
This recipe is loyal—but flexible.
Lighter version:
Swap heavy cream for half-and-half or whole milk. Still creamy, just less indulgent.
Dairy-free:
Use coconut milk or plant-based cream. Slight flavor shift, but still comforting.
More veggies:
Mushrooms, spinach, peas, carrots—toss them in during the simmer.
Spicy lovers:
Add chili flakes, cayenne, or hot sauce. Creamy + spicy is elite.
Brown rice users:
You can use it, but it needs more liquid and more time. Patience is mandatory here.
Make-Ahead, Storage & Reheating Tips
This dish is secretly a meal-prep hero.
Make-ahead:
You can season and sear the chicken, chop the onions and garlic, and store everything separately for up to 24 hours before cooking.
Fridge storage:
Store leftovers in an airtight container for up to 4 days.
Reheating:
Add a splash of broth or cream before reheating. Microwave or stovetop both work—just stir halfway through.
Freezing:
You can freeze it, but cream sauces change texture slightly when thawed. Still tasty, just less dreamy.
Common Slip-Ups (and How to Dodge Them)
Skipping the sear.
You can skip it—but you shouldn’t. That crust carries serious flavor.
Using high heat the whole time.
This cooks the chicken too fast and burns the rice underneath. Gentle heat wins.
Not checking the rice.
Different stoves = different simmer speeds. Peek and adjust.
Under-seasoning.
Cream mutes flavor. Season confidently.
Overcooking the chicken.
Dry chicken is the only true villain in this story.
Frequently Asked Questions
Can I use chicken breasts instead of thighs?
Absolutely. Just watch the cooking time—breasts dry out faster.
What if my rice is still hard at the end?
Add more broth, cover, and keep simmering. Rice has a mind of its own sometimes.
Can I make this without cream?
Yes—milk or half-and-half both work. Lower richness, same comfort.
What cheeses work best?
Cheddar and parmesan melt beautifully here.
Does this dish reheat well?
Shockingly well. Add moisture and stir—it comes back to life.
Can I add vegetables?
Yes—and you should if you want. This dish welcomes veggies warmly.
Final Thoughts
Creamy Smothered Chicken and Rice is one of those recipes that quietly becomes a weekly tradition. It’s easy enough for busy nights, comforting enough for bad days, and impressive enough for guests who “just stopped by real quick.”
It’s rich without being fussy. Cozy without being boring. And honest—this is the kind of meal that makes people scrape their plates.
So go make it. Smother that chicken. Bathe that rice.
And don’t be surprised when someone asks you to cook it again tomorrow.

Creamy Smothered Chicken and Rice
This Creamy Smothered Chicken and Rice is the ultimate one-pan comfort food made with juicy chicken, fluffy rice, and a rich, savory cream sauce. It’s easy, cozy, family-friendly, and perfect for busy weeknights when you want big flavor with minimal cleanup.
Ingredients
- 1 ½ lbs boneless, skinless chicken thighs or breasts
- 1 ½ teaspoons salt, divided
- 1 teaspoon black pepper
- 1 teaspoon paprika (smoked or regular)
- 1 teaspoon Italian seasoning or dried thyme
- 2 tablespoons olive oil
- 2 tablespoons butter, divided
- 1 small onion, finely diced
- 3 cloves garlic, minced
- 1 ½ cups long-grain white rice, uncooked
- 3 cups chicken broth (low sodium recommended)
- 1 cup heavy cream
- 1 cup shredded cheddar or parmesan cheese (optional)
- Optional add-ins: mushrooms, frozen peas, spinach, chili flakes
Instructions
- Season the chicken. Pat chicken dry and season both sides with salt, pepper, paprika, and Italian seasoning.
- Sear the chicken. Heat olive oil and 1 tablespoon butter in a large skillet over medium-high heat. Sear chicken 4–5 minutes per side until golden. Remove and set aside.
- Sauté aromatics. Add remaining butter to the same pan. Sauté onion until soft, then add garlic and cook 30 seconds.
- Toast the rice. Stir in rice and cook for 1 minute to lightly toast.
- Add liquids. Pour in chicken broth and heavy cream. Stir and bring to a gentle simmer.
- Return chicken. Nestle chicken into the rice mixture. Cover, reduce heat to low, and simmer 20–25 minutes until rice is tender and chicken is fully cooked.
- Optional cheese finish. Sprinkle cheese over the top, cover, and let melt for 2–3 minutes.
- Rest and serve. Let the dish rest 5 minutes before serving for best texture.
Notes
- For extra flavor: Use chicken thighs instead of breasts—they stay juicier.
- If rice is still firm: Add ¼–½ cup more broth and continue simmering.
- Dairy-free option: Swap heavy cream for full-fat coconut milk.
- Add vegetables: Spinach, peas, carrots, or mushrooms work beautifully.
- Storage: Refrigerate leftovers up to 4 days in an airtight container.
- Reheating tip: Add a splash of broth or cream before reheating.
Nutrition Information:
Yield: 4 servingsAmount Per Serving: Calories: 560Total Fat: 30gCarbohydrates: 45gFiber: 2gSugar: 3gProtein: 38g