

Best Chocolate Thumbprint Cookies Recipe
Think of a classic shortbread cookie and a chocolate truffle having a delicious little baby. That’s basically a Chocolate Thumbprint Cookie.
They’re small, soft cookies rolled into little dough balls, then pressed in the middle — usually with your thumb, because that’s the OG method — and filled with a smooth chocolate center. Traditional thumbprints use jam, but the chocolate version? Different league. The buttery cookie + creamy ganache combo makes each bite feel extra luxurious without being complicated.
They’re the kind of cookie that looks fancy without extra work. Pinterest loves them. Your family will love them. Your midnight cravings will definitely love them.
Why This Recipe is Awesome
Here’s the fun part — what makes THESE Chocolate Thumbprint Cookies stand out from all the rest?
- They’re melt-in-your-mouth soft. No dry, crumbly texture here. These stay pillowy.
- The chocolate center stays fudgy, not hard and chalky. A very important detail.
- No chilling required. That’s right — no hour-long dough resting. You’re baking immediately.
- Perfect for beginners. You don’t need precision-chef skills. If you can roll dough, you’re good.
- Ridiculously photogenic. These cookies look good from every angle. They beg for a Pinterest post.
- Holiday perfection. They fit any dessert box, party table, or cookie exchange.
- Easily customizable. Want caramel? White chocolate? Nutella? Jam? Go wild — this dough works with anything.
This recipe is basically the low-effort, high-reward baking experience we all need in our lives.
If quick skillet-style meals are your thing, you’ll love the flavors in my Southwest Sweet Potato Black Bean Rice Skillet—simple ingredients, huge flavor payoff.
Ingredients You’ll Need
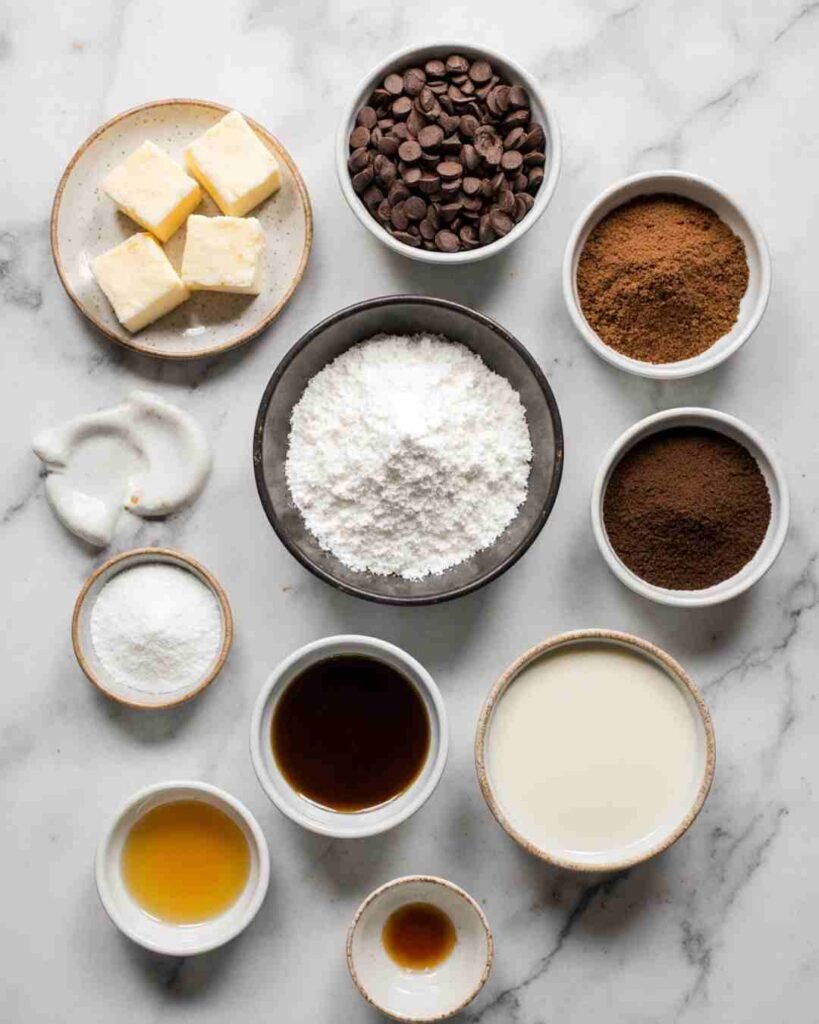
Everything here is simple, familiar, and probably sitting in your kitchen already. Let’s break it down:
- 1 cup unsalted butter, softened – because room-temperature butter is the secret to soft cookies.
- ½ cup granulated sugar – gives sweetness and helps the dough spread just right.
- ¼ cup brown sugar – adds moisture and a slightly caramel-y depth.
- 1 large egg yolk – just the yolk! Super rich and helps the dough stay tender.
- 1 teaspoon vanilla extract – always necessary.
- 2 cups all-purpose flour – the structure of your cookie universe.
- ¼ cup cocoa powder – chocolate in the dough? Yes, please.
- ½ teaspoon salt – brings out all the flavors.
- 1 cup chocolate chips – semisweet or milk, totally your call.
- 2–3 tablespoons heavy cream – makes the chocolate filling silky smooth.
Optional but cute:
- Powdered sugar (for dusting)
- Crushed nuts (for rolling edges)
- Holiday sprinkles (for Pinterest points)
Step-by-Step Instructions
1. Cream the butter and sugars
Grab a mixing bowl and beat together softened butter, white sugar, and brown sugar. Mix until it looks light, fluffy, and like it’s living its best life.
Tip: If the butter is a little firm, zap it in the microwave for 5 seconds. Not more — we’re making cookies, not butter soup.
A sturdy Hand Mixer makes this step fast and smooth, especially if your butter isn’t perfectly soft.
2. Add the egg yolk and vanilla
Mix in the yolk and vanilla until smooth. The dough becomes richer immediately, and that yolk is doing heavy lifting in the “soft cookies” department.
Real-talk: people who use whole eggs in thumbprints often end up with bouncy, cakey cookies. We’re not doing that here.
3. Mix the dry ingredients
In a separate bowl, whisk together the flour, cocoa powder, and salt. Add that mixture to the butter mixture and mix until just combined.
Do not overmix.
This is the moment where overachievers ruin cookies by stirring too much. Stop as soon as the dough comes together.
4. Shape the dough
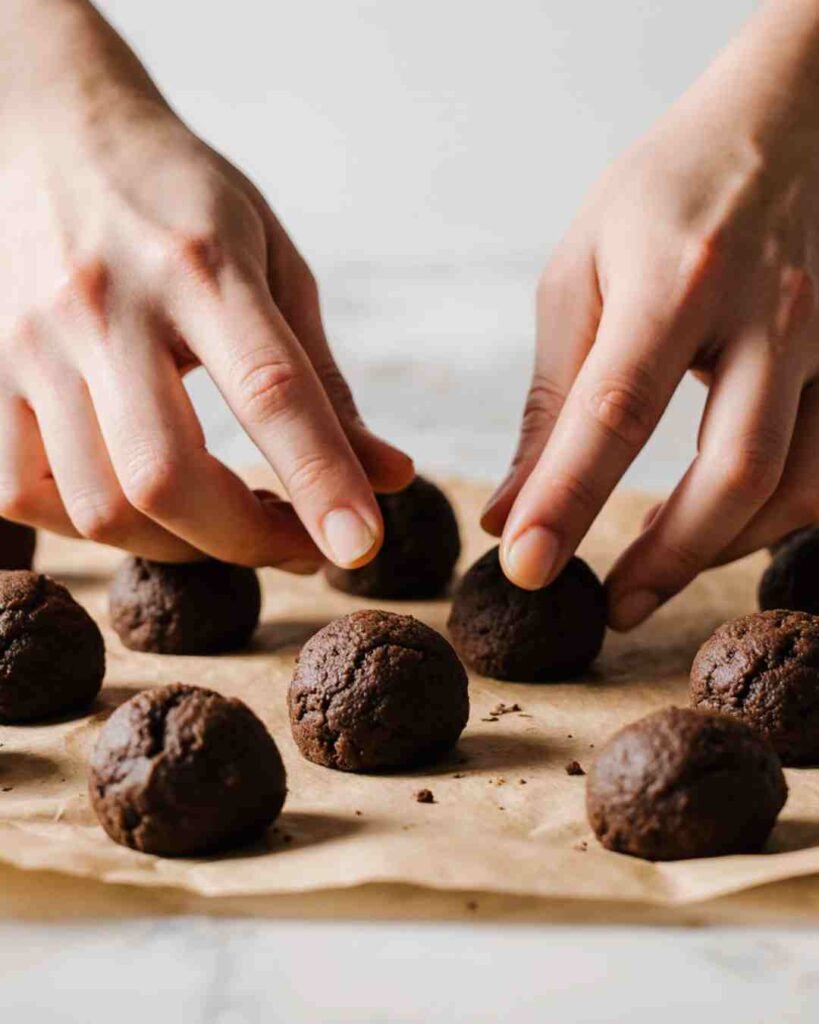
Scoop out small balls of dough (about 1–1½ tablespoons each) and roll them into smooth spheres.
Place on a baking sheet lined with parchment paper. If some come out bigger than others, fix that — uneven cookie families bake unevenly.If you like hands-on recipes like this, you’ll also enjoy rolling and shaping the pasta in my viral One-Pot Cheeseburger Macaroni — another comfort-food classic.
5. Press the thumbprints
Now for the fun part: gently press your thumb into the center of each ball.
Cracks on the edges? Totally normal. Fix them gently if you want perfect edges, or leave them for a rustic, charming look.
No desire to use your thumb?
A teaspoon, wooden spoon handle, or even a marble works too.
6. Bake
Place them in a 350°F (175°C) oven and bake for 10–12 minutes.
Don’t wait for them to look fully done — slightly soft centers are exactly what you want. They’ll set as they cool.
Overbaked thumbprints = sadness. Stay vigilant.
An inexpensive Oven Thermometer helps guarantee your oven temp is accurate, so your cookies don’t overbake.
7. Make the chocolate filling
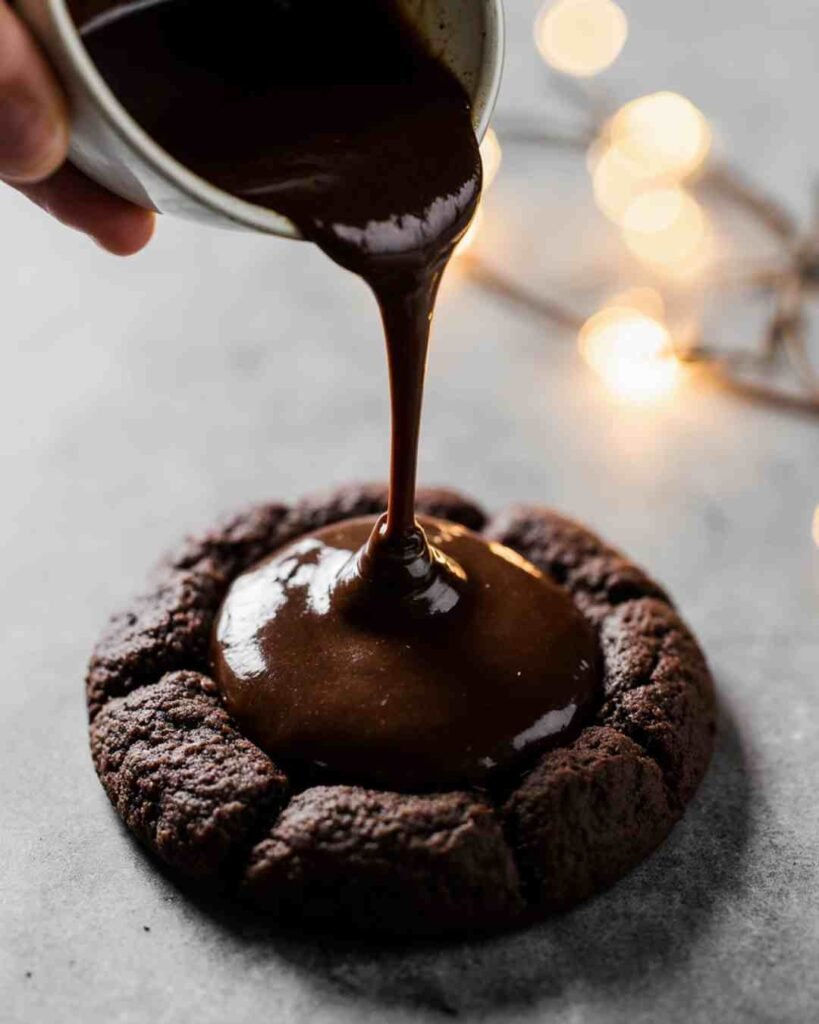
While the cookies bake, melt your chocolate chips and heavy cream in the microwave in 20-second intervals. Stir after each round until you get a glossy, smooth ganache.
If it looks too thick, add a splash of cream. Too thin? Add more chocolate. Easy fix.
8. Fill the warm cookies
Right after baking, spoon or pipe the warm ganache into the thumbprint indentations. Watching the chocolate fill the centers is deeply therapeutic — don’t skip the moment.A simple Piping Bottle Set makes filling the centers cleaner and super fun.
9. Let them set
Let the cookies cool so the chocolate thickens slightly.
Or… eat one immediately. It’s your kitchen. Your rules. Your melty-chocolate experience.
Tips to Perfect This Recipe
Want pro-level cookies without the stress? Here’s the insider knowledge:
- Use room-temperature butter — always. Cold butter ruins the texture. Melted butter spreads too much.
- Measure flour the right way: spoon into a cup and level off. Packed flour = dry cookies.
- Don’t skip the salt. Salt makes chocolate taste more chocolatey.
- If the dough is cracking a lot, add 1 extra tablespoon of butter to soften it.
- Re-press the indent after baking if it puffed up too much.
- Roll in nuts or sprinkles before baking for cute decorated edges.
These cookies are simple, but a few smart little details take them from “nice” to “holy wow, who made these?”
Want more baking shortcuts and smart tricks? My Coconut & Berry Yogurt Bark for Dogs is packed with simple, time-saving hacks.
Alternatives & Substitutions
Want your cookies to match your mood? Try one of these fun twists:
- Nutella Filling: No melting needed. Just pipe it in warm cookies. Instant crowd-pleaser.
- Salted Caramel Center: Add a tiny sprinkle of flaky sea salt. Your taste buds will applaud.
- Jam Thumbprints: Strawberry, raspberry, blueberry — go classic grandma style.
- White chocolate ganache: For a sweeter, creamier variation.
- Mint chocolate filling: Add a drop of peppermint extract for holiday magic.
- Hazelnut dough: Replace ½ cup flour with ground hazelnuts for Ferrero Rocher vibes.
- Gluten-free flour blend: Works well if it’s a 1:1 baking mix.
Honestly, this dough is so forgiving that you can experiment all you want and still end up with something delicious.
Common Mistakes to Avoid
Let’s save you from cookie heartbreak:
- Not preheating the oven.
This is not optional. Cookies need consistent heat from the second they go in. - Using cold butter.
Your mixer cries. Your cookies turn dense. Don’t do it. - Overbaking because they look “too soft.”
They’re supposed to look a little soft. They set while cooling. - Skipping the heavy cream in the ganache.
Water + chocolate = disaster. Cream makes it silky. - Pressing too deeply.
We’re baking cookies, not digging wells. Gentle pressure is enough. - Rolling dough too large.
Giant cookies lose their shape. Smaller = cuter. - Forgetting to stir the chocolate during melting.
Burned chocolate is trauma you can smell.
Ideas to Decorate or Serve

If you want these to go viral on Pinterest—or just look adorable:
- Dust with powdered sugar for a “snowy” holiday vibe.
- Roll the dough balls in finely chopped nuts before baking.
- Add Christmas sprinkles around the edge.
- Drizzle white chocolate over the filled centers.
- Sprinkle flaky sea salt on top (chef-level move).
- Use colored melts for Valentine’s Day, Easter, or themed parties.
These cookies dress up easily and look more impressive than the effort you put in… which is sweet poetic justice.
If you’re into colorful, head-turning meals, you’ll adore the bright flavors in my Vegetarian Black Bean Enchiladas — just as photogenic as these cookies.
FAQ (Frequently Asked Questions)
1. Do I have to use my actual thumb?
Not at all. Spoon handles, measuring spoons, even wine corks (yes, really) can make perfect indents.
2. Can I freeze these cookies?
Yes! Freeze unbaked dough balls or baked cookies before filling. Add filling after thawing for best results.
3. Why did my thumbprints disappear in the oven?
The dough was too warm. Chill shaped cookies for 10 minutes next time before baking.
4. Can I double the recipe?
Absolutely. And honestly? You should. These go fast.
5. Can I make these without a mixer?
Yep! Just use soft butter and a little arm strength. Totally doable.
6. Why did my cookies crack too much?
The dough might be dry. Next time add a tablespoon of butter—or press more gently.
7. Can I use dark chocolate instead of milk?
Of course! Dark chocolate makes them feel extra fancy and grown-up.
Final Thoughts
There you have it: the softest, cutest, most chocolate-filled thumbprint cookies you’ll ever bake. They’re fun to make, even more fun to decorate, and dangerously easy to eat. Whether you’re baking for the holidays, a bake sale, a party, or just because your sweet tooth whispered “do it,” this recipe always hits.
So grab your butter, your chocolate, and your thumb (the star of the show). It’s cookie-baking time — and trust me, you’re about to impress everyone, including yourself.

Chocolate Thumbprint Cookies
These Chocolate Thumbprint Cookies are soft, buttery, and filled with rich, glossy chocolate ganache. They’re easy to make, beginner-friendly, and perfect for holidays, gifting, or whenever a chocolate craving hits. A cozy, Pinterest-ready treat that always gets compliments!
Ingredients
- 1 cup unsalted butter, softened
- ½ cup granulated sugar
- ¼ cup brown sugar
- 1 large egg yolk
- 1 teaspoon vanilla extract
- 2 cups all-purpose flour
- ¼ cup cocoa powder
- ½ teaspoon salt
- 1 cup chocolate chips (semisweet or milk chocolate)
- 2–3 tablespoons heavy cream
- Optional toppings: powdered sugar, chopped nuts, holiday sprinkles
Instructions
- Cream Butter & Sugars Beat softened butter, granulated sugar, and brown sugar until light and fluffy.
- Add Egg Yolk & Vanilla Mix in the egg yolk and vanilla until smooth and combined.
- Combine Dry Ingredients Whisk flour, cocoa powder, and salt in a separate bowl, then add to the wet ingredients. Mix just until a dough forms.
- Shape the Dough Roll dough into small balls (1–1½ tablespoons each) and place on a parchment-lined baking sheet.
- Press Thumbprints Gently press your thumb or the back of a teaspoon into the center of each dough ball.
- Bake Bake at 350°F (175°C) for 10–12 minutes. Cookies should remain soft in the center.
- Make the Ganache Melt chocolate chips and heavy cream in 20-second microwave bursts, stirring until smooth.
- Fill Cookies Spoon or pipe warm ganache into each thumbprint indentation.
- Let Set Allow cookies to cool until the chocolate thickens slightly.
Notes
Nutrition Information:
Yield: 120Amount Per Serving: Total Fat: 7gCarbohydrates: 13gFiber: 1gSugar: 7gProtein: 1,5g